ransackを利用した日付指定での検索方法
[ransack]Gemを利用した日付指定での検索方法
下記のように日付を指定しての検索方法の実装方法になります

フィールドにカレンダー機能を付与する場合は、以下のように[f.date_field]を利用する
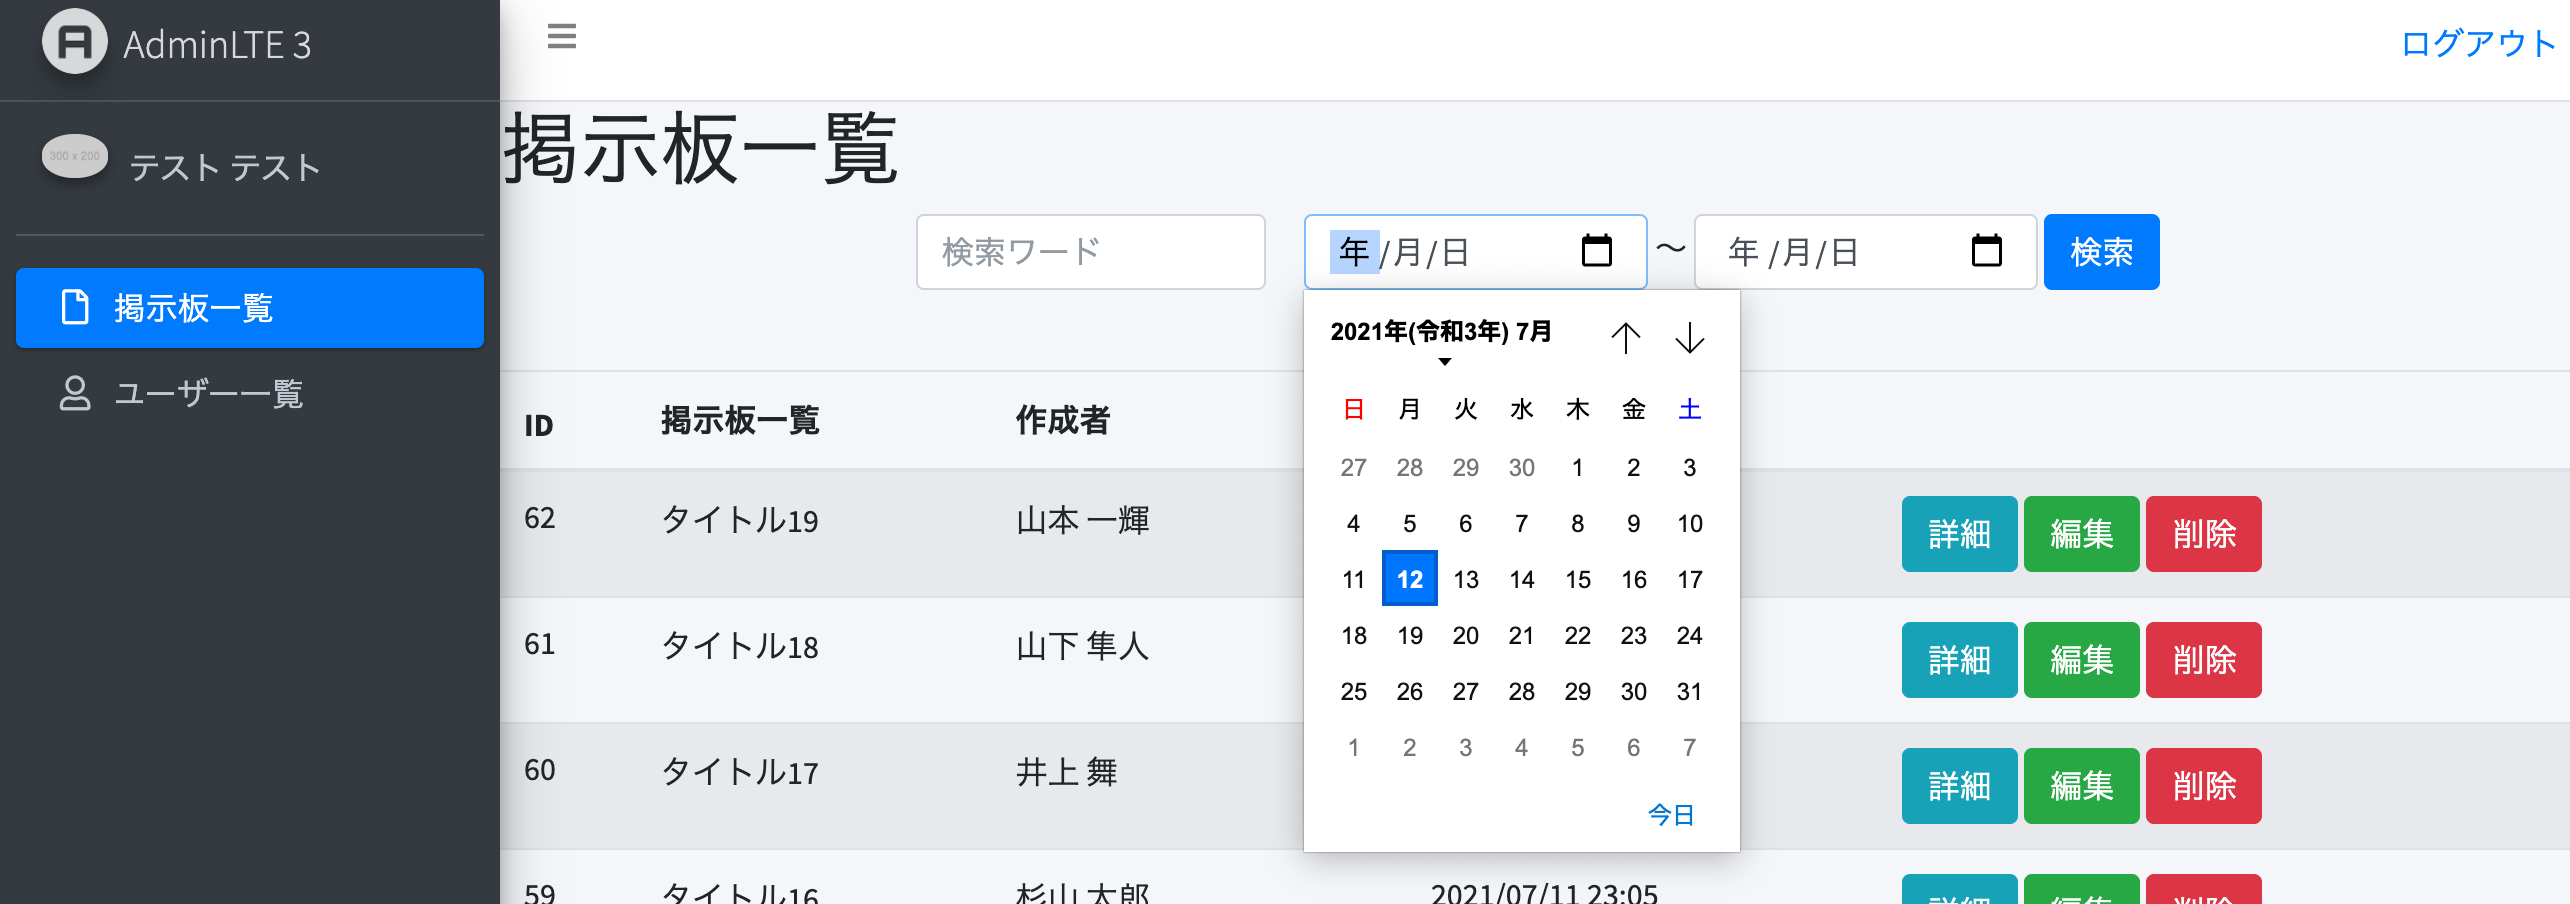
[app/views ファイル]
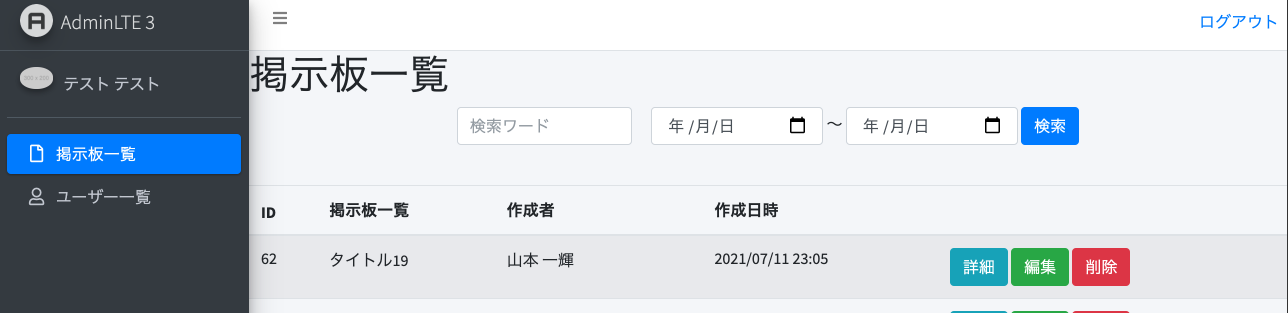
<%= search_form_for @q, url: admin_boards_path do |f| %>
<%= f.search_field :title_or_body_cont, class: 'form-control mr-3', placeholder: t('defaults.search_word') %>
<%= f.date_field :created_at_gteq, class: 'form-control' %>
〜
<%= f.date_field :created_at_lteq, class: 'form-control' %>
<%= f.submit class: 'btn btn-primary' %>
<% end %>
[ransack]Gemを使って日付指定での検索を実装する際に以下のように記述するとうまくいかない。
[app/controllers ファイル]

  def index
    @q = Board.ransack(params[:q])
    @boards = @q.result(distinct: true).includes(:user).order(created_at: :desc).page(params[:page])
  end
[app/views ファイル]

    <%= search_form_for @q, url: admin_boards_path do |f| %>
      <%= f.search_field :title_or_body_cont, class: 'form-control mr-3', placeholder: t('defaults.search_word') %>
      <%= f.date_field :created_at_gteq, class: 'form-control' %>
      〜
      <%= f.date_field :created_at_lteq, class: 'form-control' %>
        <%= f.submit class: 'btn btn-primary' %>
    <% end %>
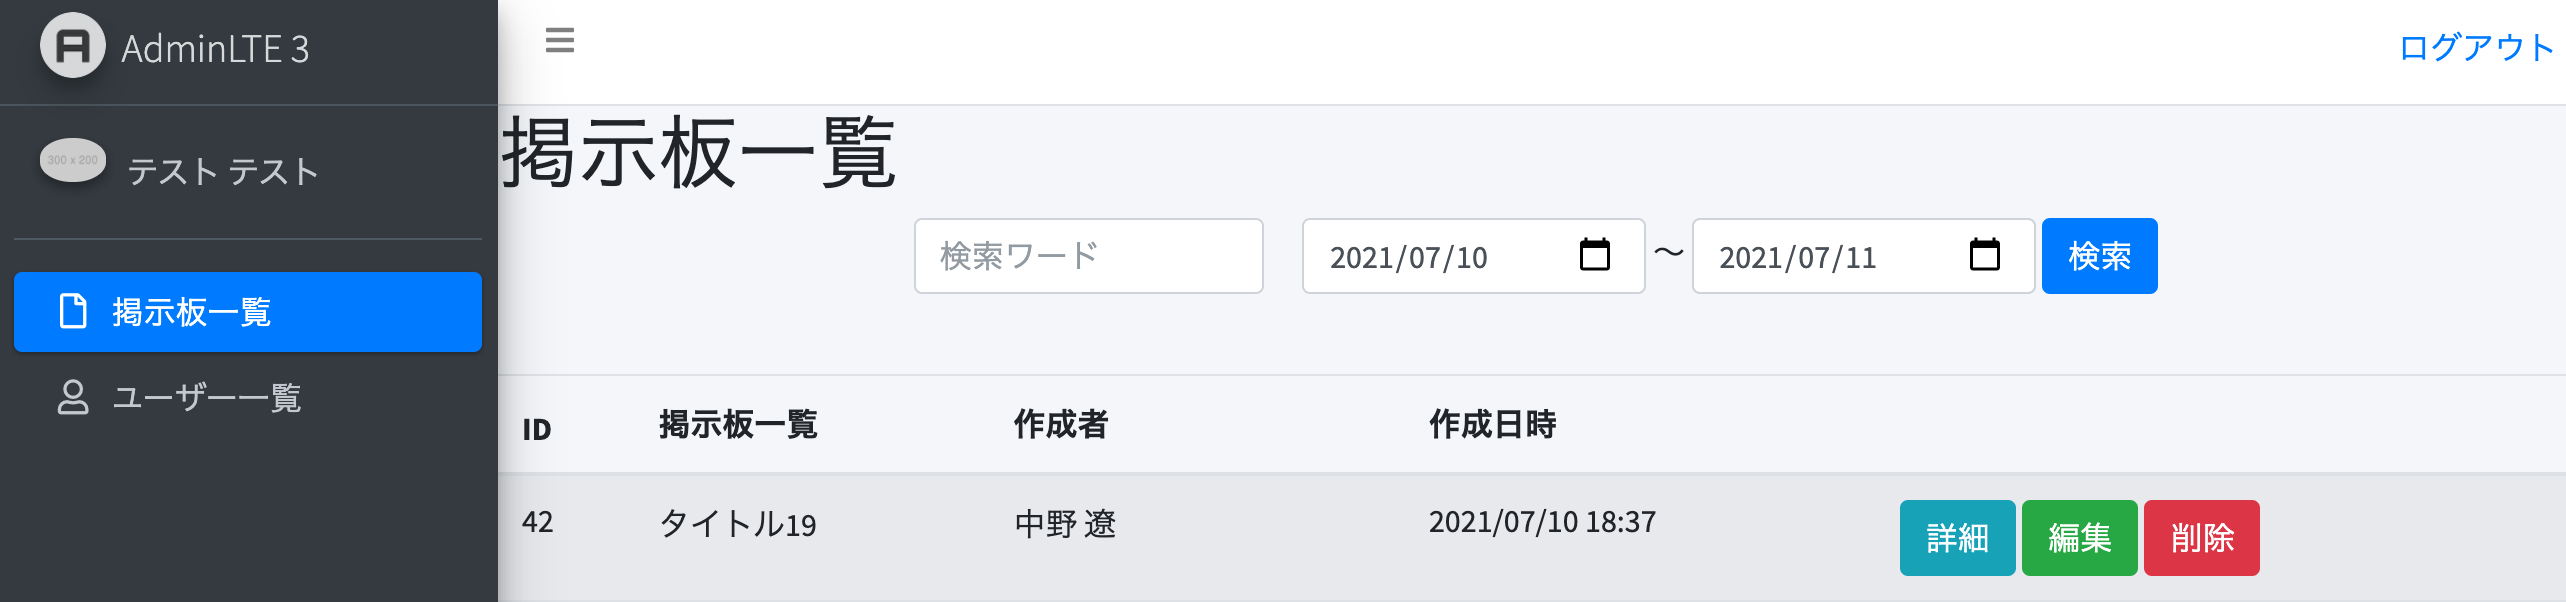
上記のように記述すると以下のように検索をかけても7/11の分が検索結果に出てこない
サーバーのログを確認してみると以下のようになっている
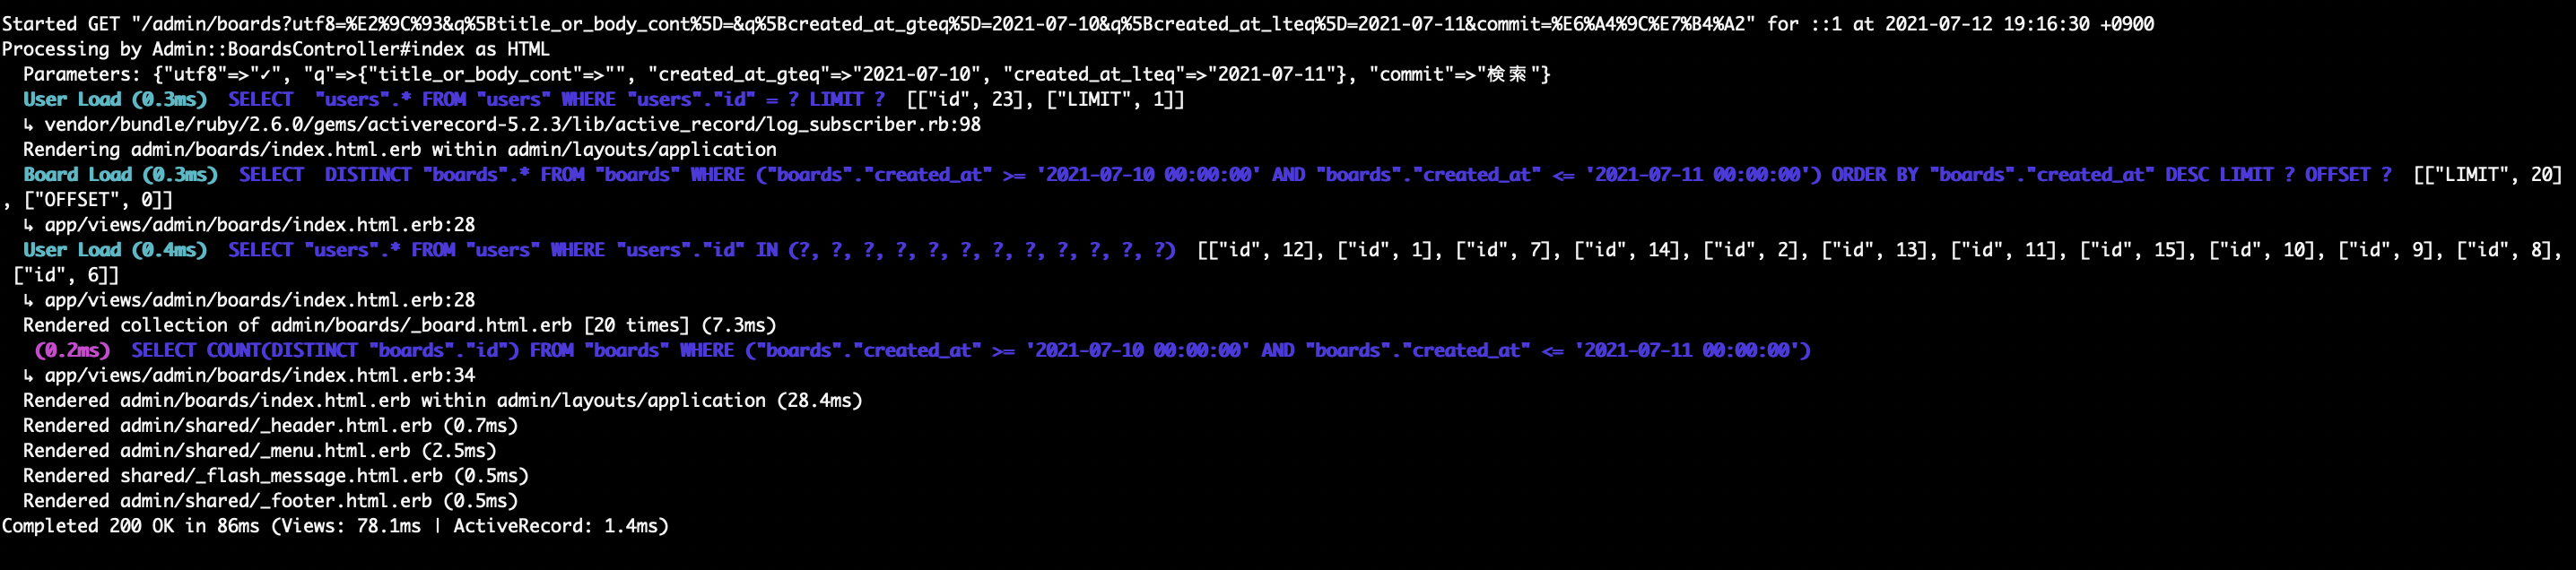
[7/10 0時0分]〜[7/11 0時0分]の検索になってしまっている
実際に検索をかけたいのは、[7/10 0時0分]〜[7/11 23時59分]である
[ransack]Gemに元々備えられているMatchersを利用しても上記のようなPredicate([7/11 23時59分]という条件)は、実現できないので自分でPredicateをカスタマイズする必要がある。
Predicateをカスタマイズする方法は、[config/initializers/ransack.rb]に以下のような記述をして各設定をする(下記の記述は、[ransack]GemのGitHubのWikiのCustom Predicatesの欄に記載がある)
[config/initializers/ransack.rb]

Ransack.configure do |config|
  config.add_predicate 'equals_diddly',    # Predicateの名前を設定

    arel_predicate: 'eq',    #  どんな動きをするかを設定(カスタマイズしたいpredicateを指定)

    formatter: proc { |v| "#{v}-diddly" },    #  検索で入力されるフォーマットをこのブロック内で自分で自由に変える

    validator: proc { |v| v.present? },   #  バリデーションで値を検証する。無効な値は、検索に使用されない

    compounds: true,   #  これは恐らく複数のarel_predicateの組み合わせをtrueにするかということ。デフォルトではtrueになっており、基本的にはいじらなくてOK

    type: :string,  #  与えられた値をここで設定した型に変換する。基本的には、DBのカラムのタイプを設定する<br>

    case_insensitive: true   #  大文字と小文字を区別する設定(デフォルトではfalseになっている)
end
今回のように[7/10 0時0分]〜[7/11 23時59分]というような検索をするためのPredicateのカスタマイズと検索フィールドの記述は、以下のようになる
[config/initializers/ransack.rb]

Ransack.configure do |config|
  config.add_predicate 'lteq_end_of_day',
                       arel_predicate: 'lteq',
                       formatter: proc { |v| v.end_of_day },   # end_of_dayメソッドを利用することで23時59分までが対象になる
                       validator: proc { |v| v.present? },
                       compounds: true,
                       type: :datetime,
                       case_insensitive: true
end
[app/views ファイル]

    <%= search_form_for @q, url: admin_boards_path do |f| %>
      <%= f.search_field :title_or_body_cont, class: 'form-control mr-3', placeholder: t('defaults.search_word') %>
      <%= f.date_field :created_at_gteq, class: 'form-control' %>
      〜
      <%= f.date_field :created_at_lteq_end_of_day, class: 'form-control' %>  # カスタマイズした[lteq_end_of_day]のPredicateを利用
        <%= f.submit class: 'btn btn-primary' %>
    <% end %>
※ポイント
Predicate: Ransackの検索クエリの中で、どのような情報をマッチさせるかを決定するために使用される
end_of_day: レシーバの日付の23時59分59秒を返す
※ハマったこと
ransackを使って検索フォームに値を入力して検索をかけると以下のエラーになる
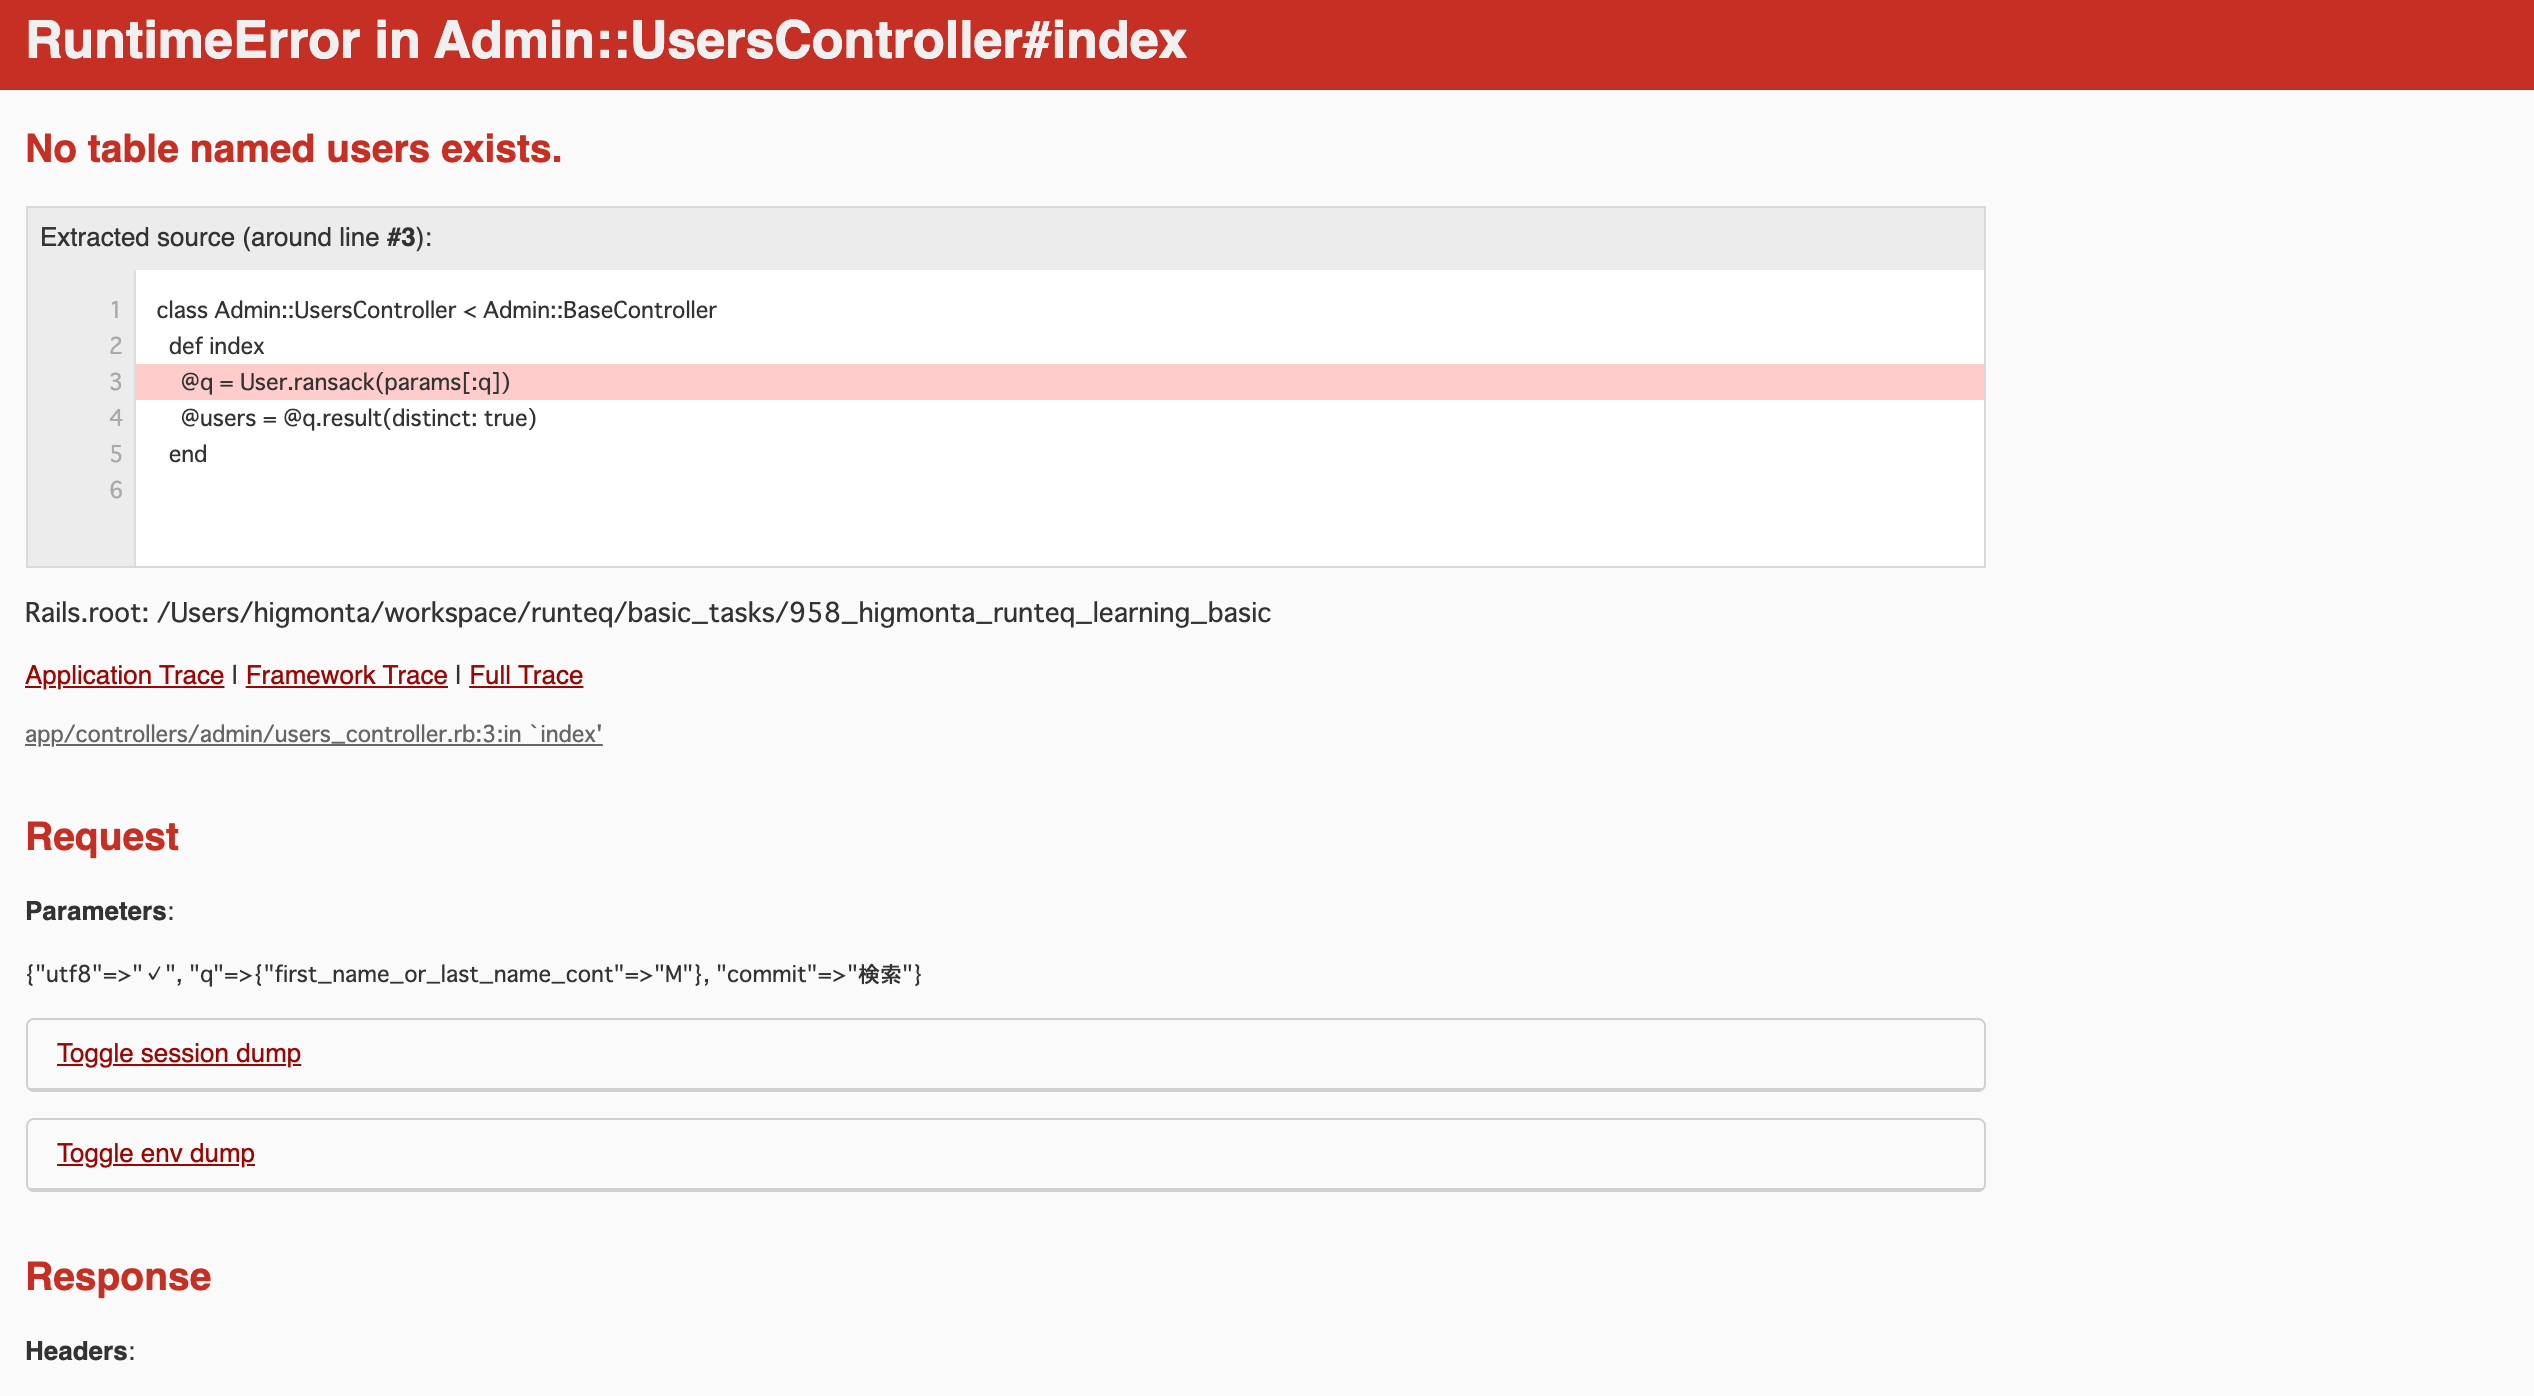
スキーマでテーブル名が以下のようにUsersと大文字になっていたのが原因
参考記事:
【Rails】日付入力フォームをカレンダー式にしたい(date型, datetime型) - Qiita
enum_help Gemによるenumの翻訳
下記のように設定したenumを日本語で表示できるようにするのが、[enum_help]Gem
[app/models ファイル]
enum role: { general: 0, admin: 1 }
上記のようにenumを設定した場合は、下記のようになる
[enum_help]Gemを使った場合は、以下のようになる

[enum_help]の導入手順は、以下のようになる
Gemfileに以下のように記載する
[Gemfile]

gem 'enum_help'
↓
$ bundle install
↓
[config/locales/ja.yml]に翻訳内容を記載する
[config/locales/activerecord/ja.yml]

ja:
  enums:
    user:
      role:
        general: '一般'
        admin: '管理者'
参考記事:
メニューのアクティブ化
メニューのアクティブ化
下記のようにメニューボタンをクリックしたらアクティブ化する
[手順]
Bootstrapの機能により、classでactiveを設定すると設定した部分がアクティブ化する
メニューのボタンが複数存在する時に以下のようにそれぞれにclassでactiveを設定すると以下のようになってしまう(本来はクリックした時にクリックした部分たけアクティブにしたい)
[app/views ファイル]

<%= link_to admin_boards_path, class: "nav-link active" do %>

<%= link_to admin_users_path, class: "nav-link active" do %>
↓
以下のように記述する
[app/views ファイル]
<%= link_to admin_boards_path, class: "nav-link #{active_if('admin/boards')}" do %>

<%= link_to admin_users_path, class: "nav-link #{active_if('admin/users')}" do %>
[app/helpers/application_helper.rb]

  def active_if(path)
    path == controller_path ? 'active' : ''
  end
上記記述により、
どこもクリックしていない時: 下記画面は[dashboards]コントローラの[index]アクションの画面なので[active_if('admin/boards')]も[active_if('admin/users')]もdef active_if(path)がfalseになり返り値が['']なので、メニューアクティブにならない
メニューをクリックした時: 下記画面は[admin::boards]コントローラの[index]アクションの画面なので[active_if('admin/boards')]部分がdef active_if(path)がtrueになり返り値が['active']になり、メニューがアクティブになる
[admin::boards]コントローラの[index]アクションの画面なので[active_if('admin/users')]部分はdef active_if(path)がfalseになり返り値が['']になり、アクティブ化されない
別解として以下のような記述の方法もある
[app/helpers/application_helper.rb]

def active_if(*path)
  active_menu?(*path) ? 'active' : ''
end

def active_menu?(*path)
  path.any? { |c| c == controller_path }
end
[app/views ファイル]

<%= link_to admin_boards_path, class: "nav-link #{active_if('admin/boards', 'admin/dashboards')}" do %>
上記の記述だと、引数を複数渡せるように可変長引数を使って、どれかに当てはまればactiveにするという事が実現できる
def active_menu?(*path)は、以下の記述を省略した書き方
def active_menu?(*path)
  path.any?  do |c|
    c == controller_path
  end
end
※ポイント
・[controller_path]でコントローラのパスを取得できる
・可変長引数: 引数が固定ではなく任意の個数を受け取れる(*のついた引数は可変長引数)
参考記事:
サイドメニューのアクティブ・非アクティブ化 - Ruby on Rails Learning Diary
Ruby on RailsでAction名やController名を取得する
Railsでアクティブなページに対応するタブのスタイル変える場合 - なんかの備忘録
【Rails入門】any?メソッドの便利な使い方を紹介 | 侍エンジニアブログ
Rubyにおける可変長引数の使い方を現役エンジニアが解説【初心者向け】 | TechAcademyマガジン
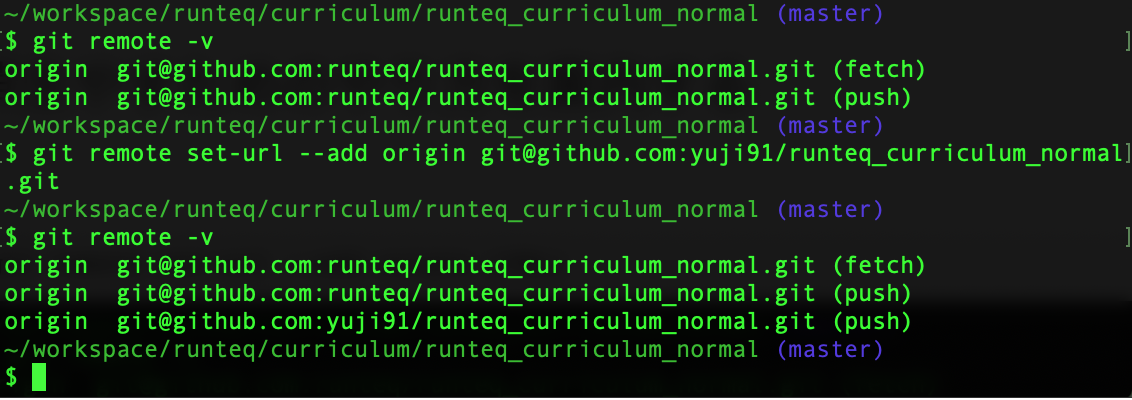
ローカルのコミット履歴をGitHubにも反映させる方法
ローカルのコミット履歴をGitHub(リモート)にも反映させる手順
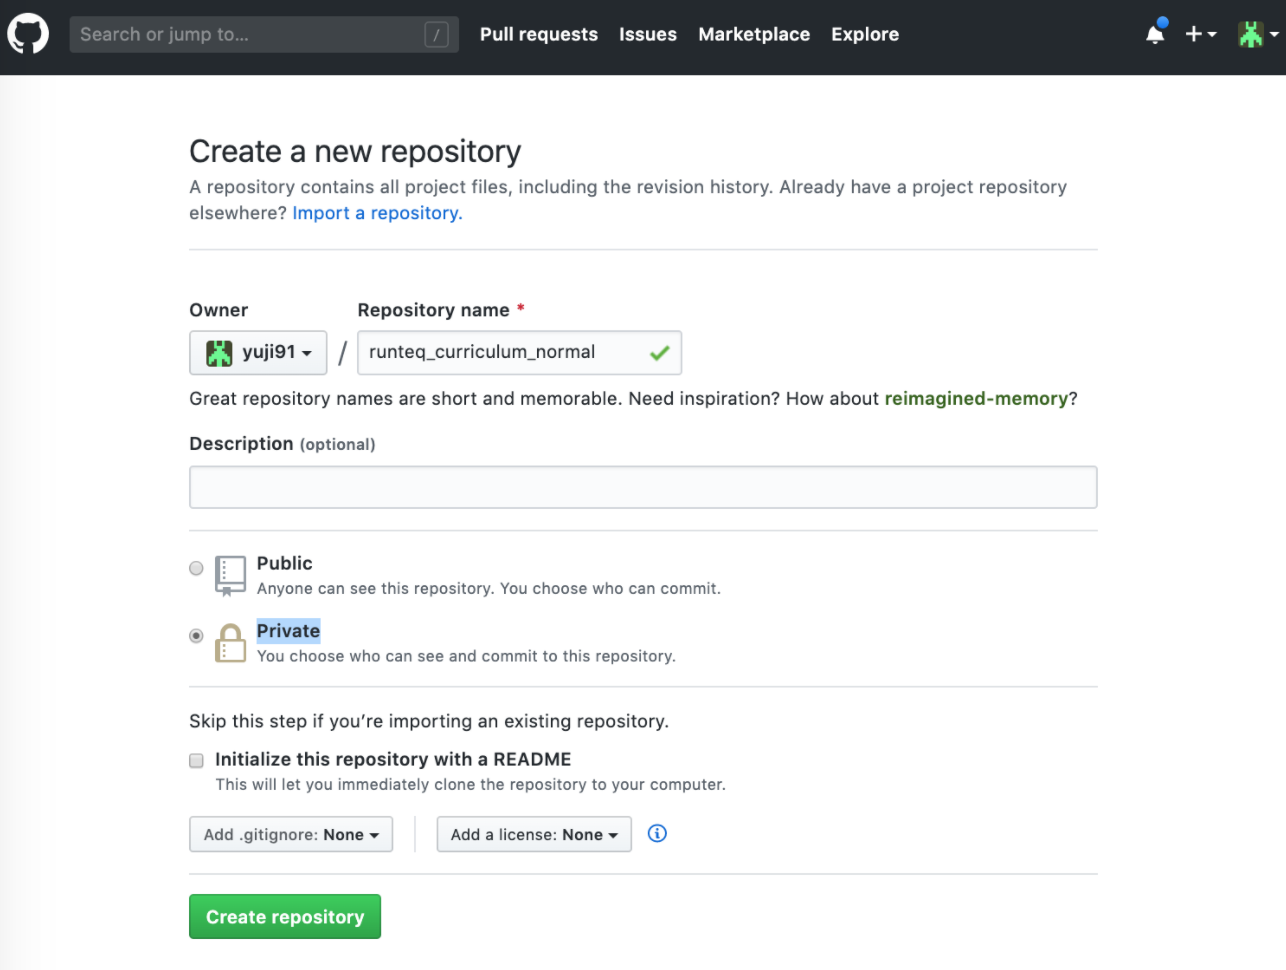
自分のGitHubを開き以下のようにRepositories(リポジトリ一覧)をクリックし、Newをクリックして新規のリポジトリを作成する。

↓
下記のような画面になるので、リポジトリの名前を決めてCreate ripositoryをクリック
↓
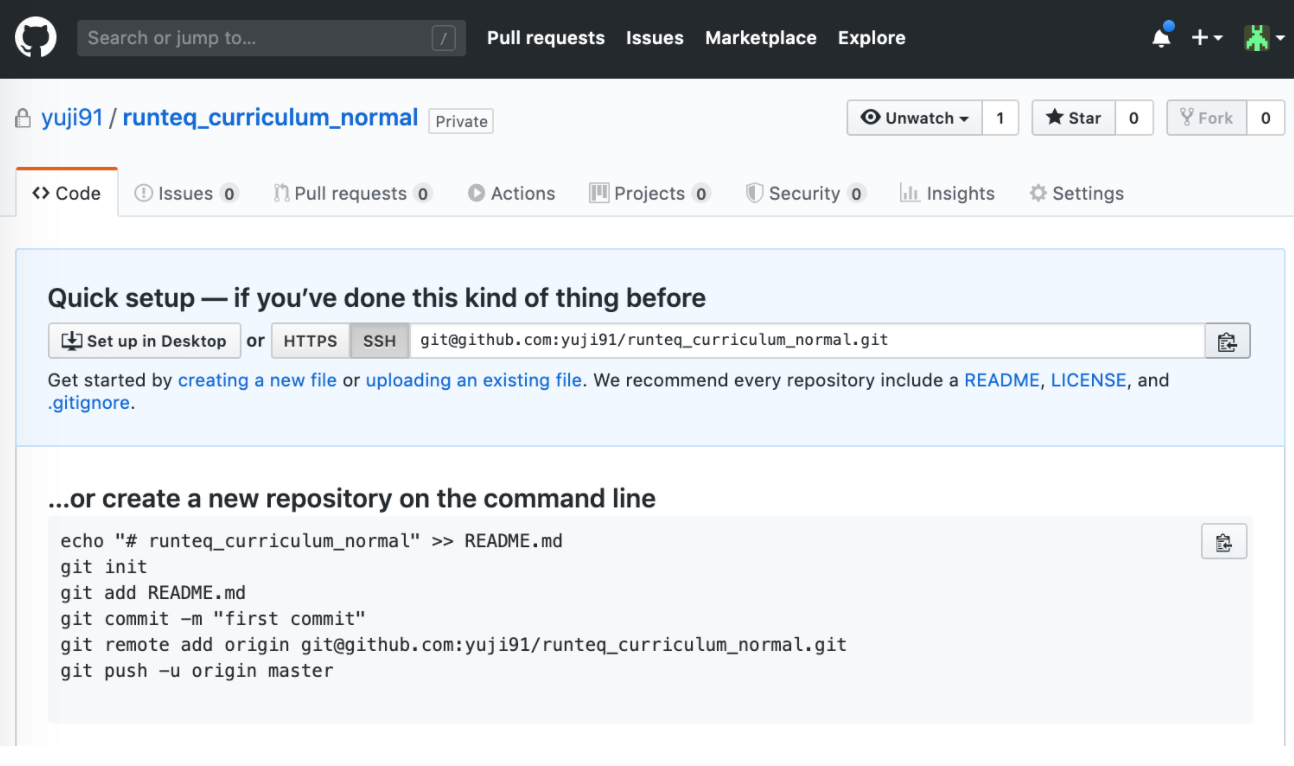
下記のような画面になるので、作成したリポジトリのURLをコピーする
↓
GitHubに反映させたい作業用フォルダに移動してターミナルにて以下のコマンドを実行すると、登録されているリモートの情報が出る(まだリモートのURLを登録していないので、何も出ないはず)
$ git remote -v
↓
下記コマンドでリモートのURLを登録する(URLは先ほどGitHubでコピーしたもの)
下記コマンドは、既にリモートリポジトリと紐づいているが、紐付けるリモートリポジトリを変えるためのコマンドの為、そもそもリモートリポジトリと紐づいていない場合は、git remote add origin [記録先リポジトリのURL]で対象のリモートリポジトリと紐付けをしたら、git pushでリモートリポジトリに反映させる
$ git remote set-url --add origin [記録先リポジトリのURL]
↓
以下コマンドを実行するとURLが登録されたのが確認できる
$ git remote -v
↓
下記コマンドでリモートリポジトリに内容をコピーできる
$ git push
参考記事:
第14話 リモートリポジトリを追加・削除しよう【連載】マンガでわかるGit ~コマンド編~ - itstaffing エンジニアスタイル
管理画面の作成
[管理画面の作成]
管理画面を作成するのに今回は、AdminLTEというパッケージ管理ツールを用いる。
[AdminLTE]をインストールするのにyarnからインストールする。
Gemからもインストールできるが、Gemだとメンテナンスが追いついていなく、バージョンも古いバージョンしかインストールできない為。
JavascriptパッケージのリポジトリはRailsに限らず、様々な言語で利用されるためメンテナンスも頻繁に行われる。
Gemとパッケージ管理ツールで利用されている数を比較するのにGitHubの右上の星の数を比較するのが良い。

※
・yarn: node.jsのパッケージマネージャ
・node.js: サーバーサイドで使えるJavaScriptの1種
・パッケージマネージャ: 言語の各パッケージのインストール・アンインストールを行うツール。インストールやアップグレードの際には、依存関係にあるパッケージも自動でインストール・アップグレートしてくれる。(Gemは、Rubyのパッケージマネージャ)
・AdminLTE: Bootstrap3をベースにした、管理画面等のテンプレートテーマ
[AdminLTE]のインストール手順と使い方
下記で[AdminLTE]をインストールする。
$ yarn add admin-lte@^3.0
※yarnを使ってのインストールになる為、yarnをインストールしていない時はyarnのインストールが必要になる。
↓
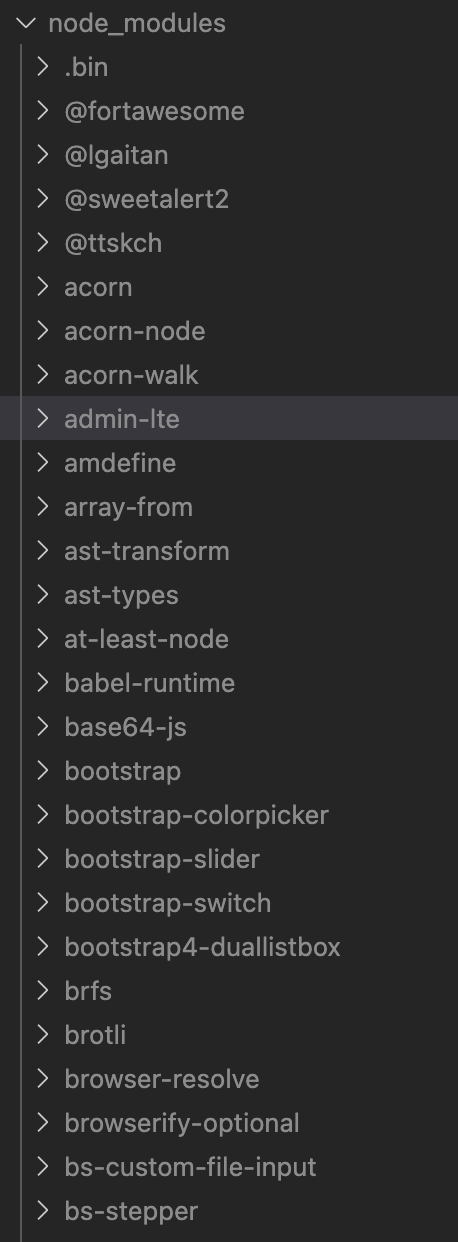
上記で[AdminLTE]をインストールすると下記のような[node_modules]ディレクトリ以下にファイルがダウンロードされる。
↓
今回は、管理画面へのログイン画面とログイン後の画面を作成する。
上記で[AdminLTE]をインストールして、ディレクトリやファイルがたくさんあるが[node_modules/admin-lte]ディレクトリに[AdminLTE]関連のファイルがある。
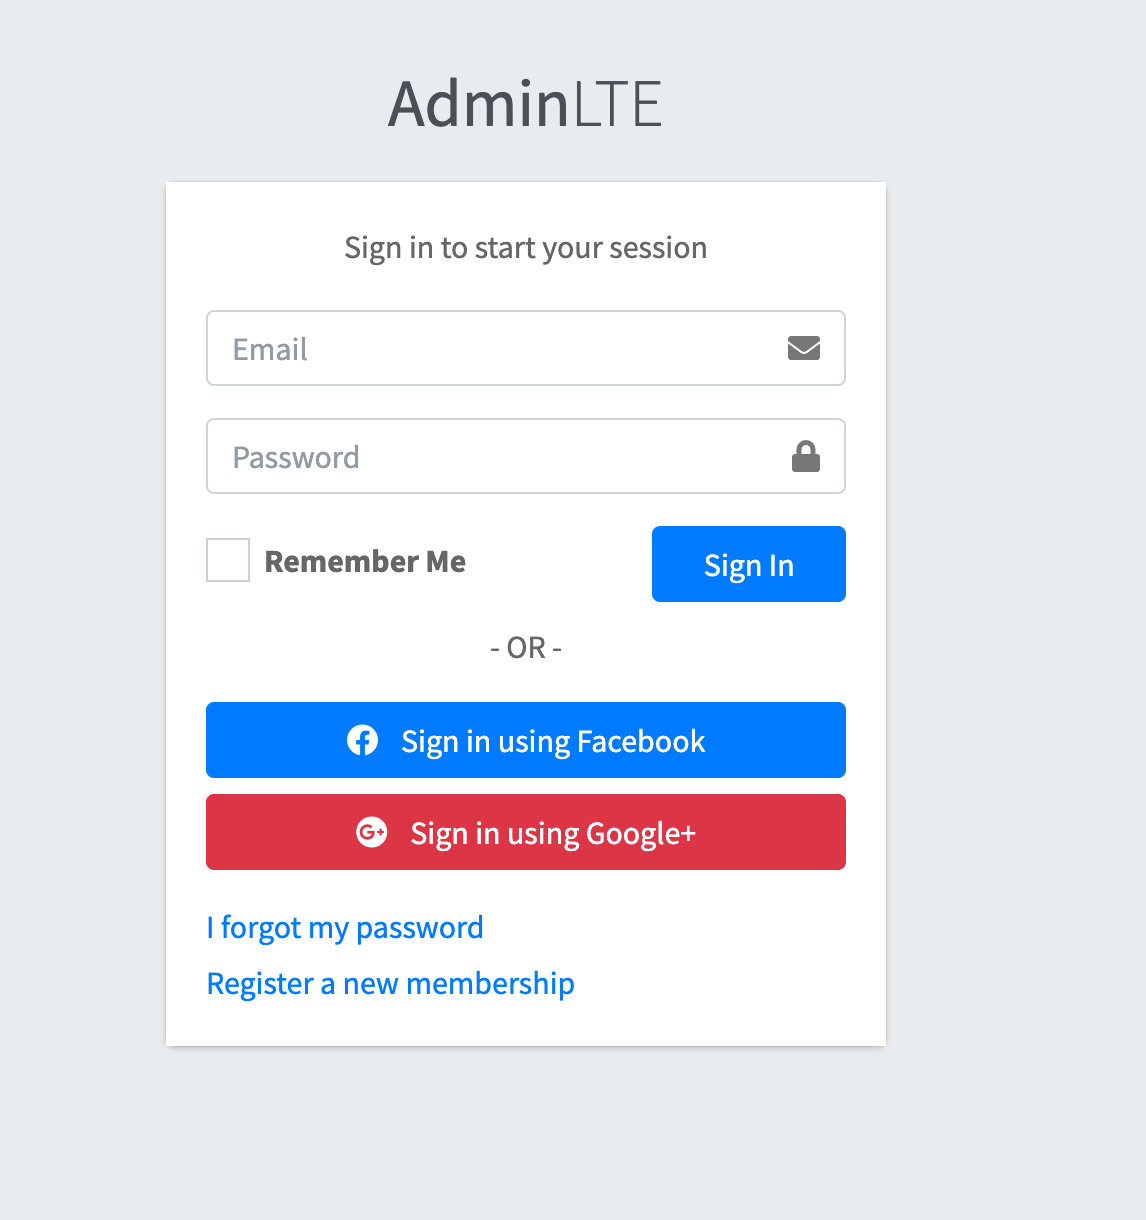
下記のようなログイン後の管理画面のHTMLは、[node_modules/admin-lte/starter.html]に記載がある。
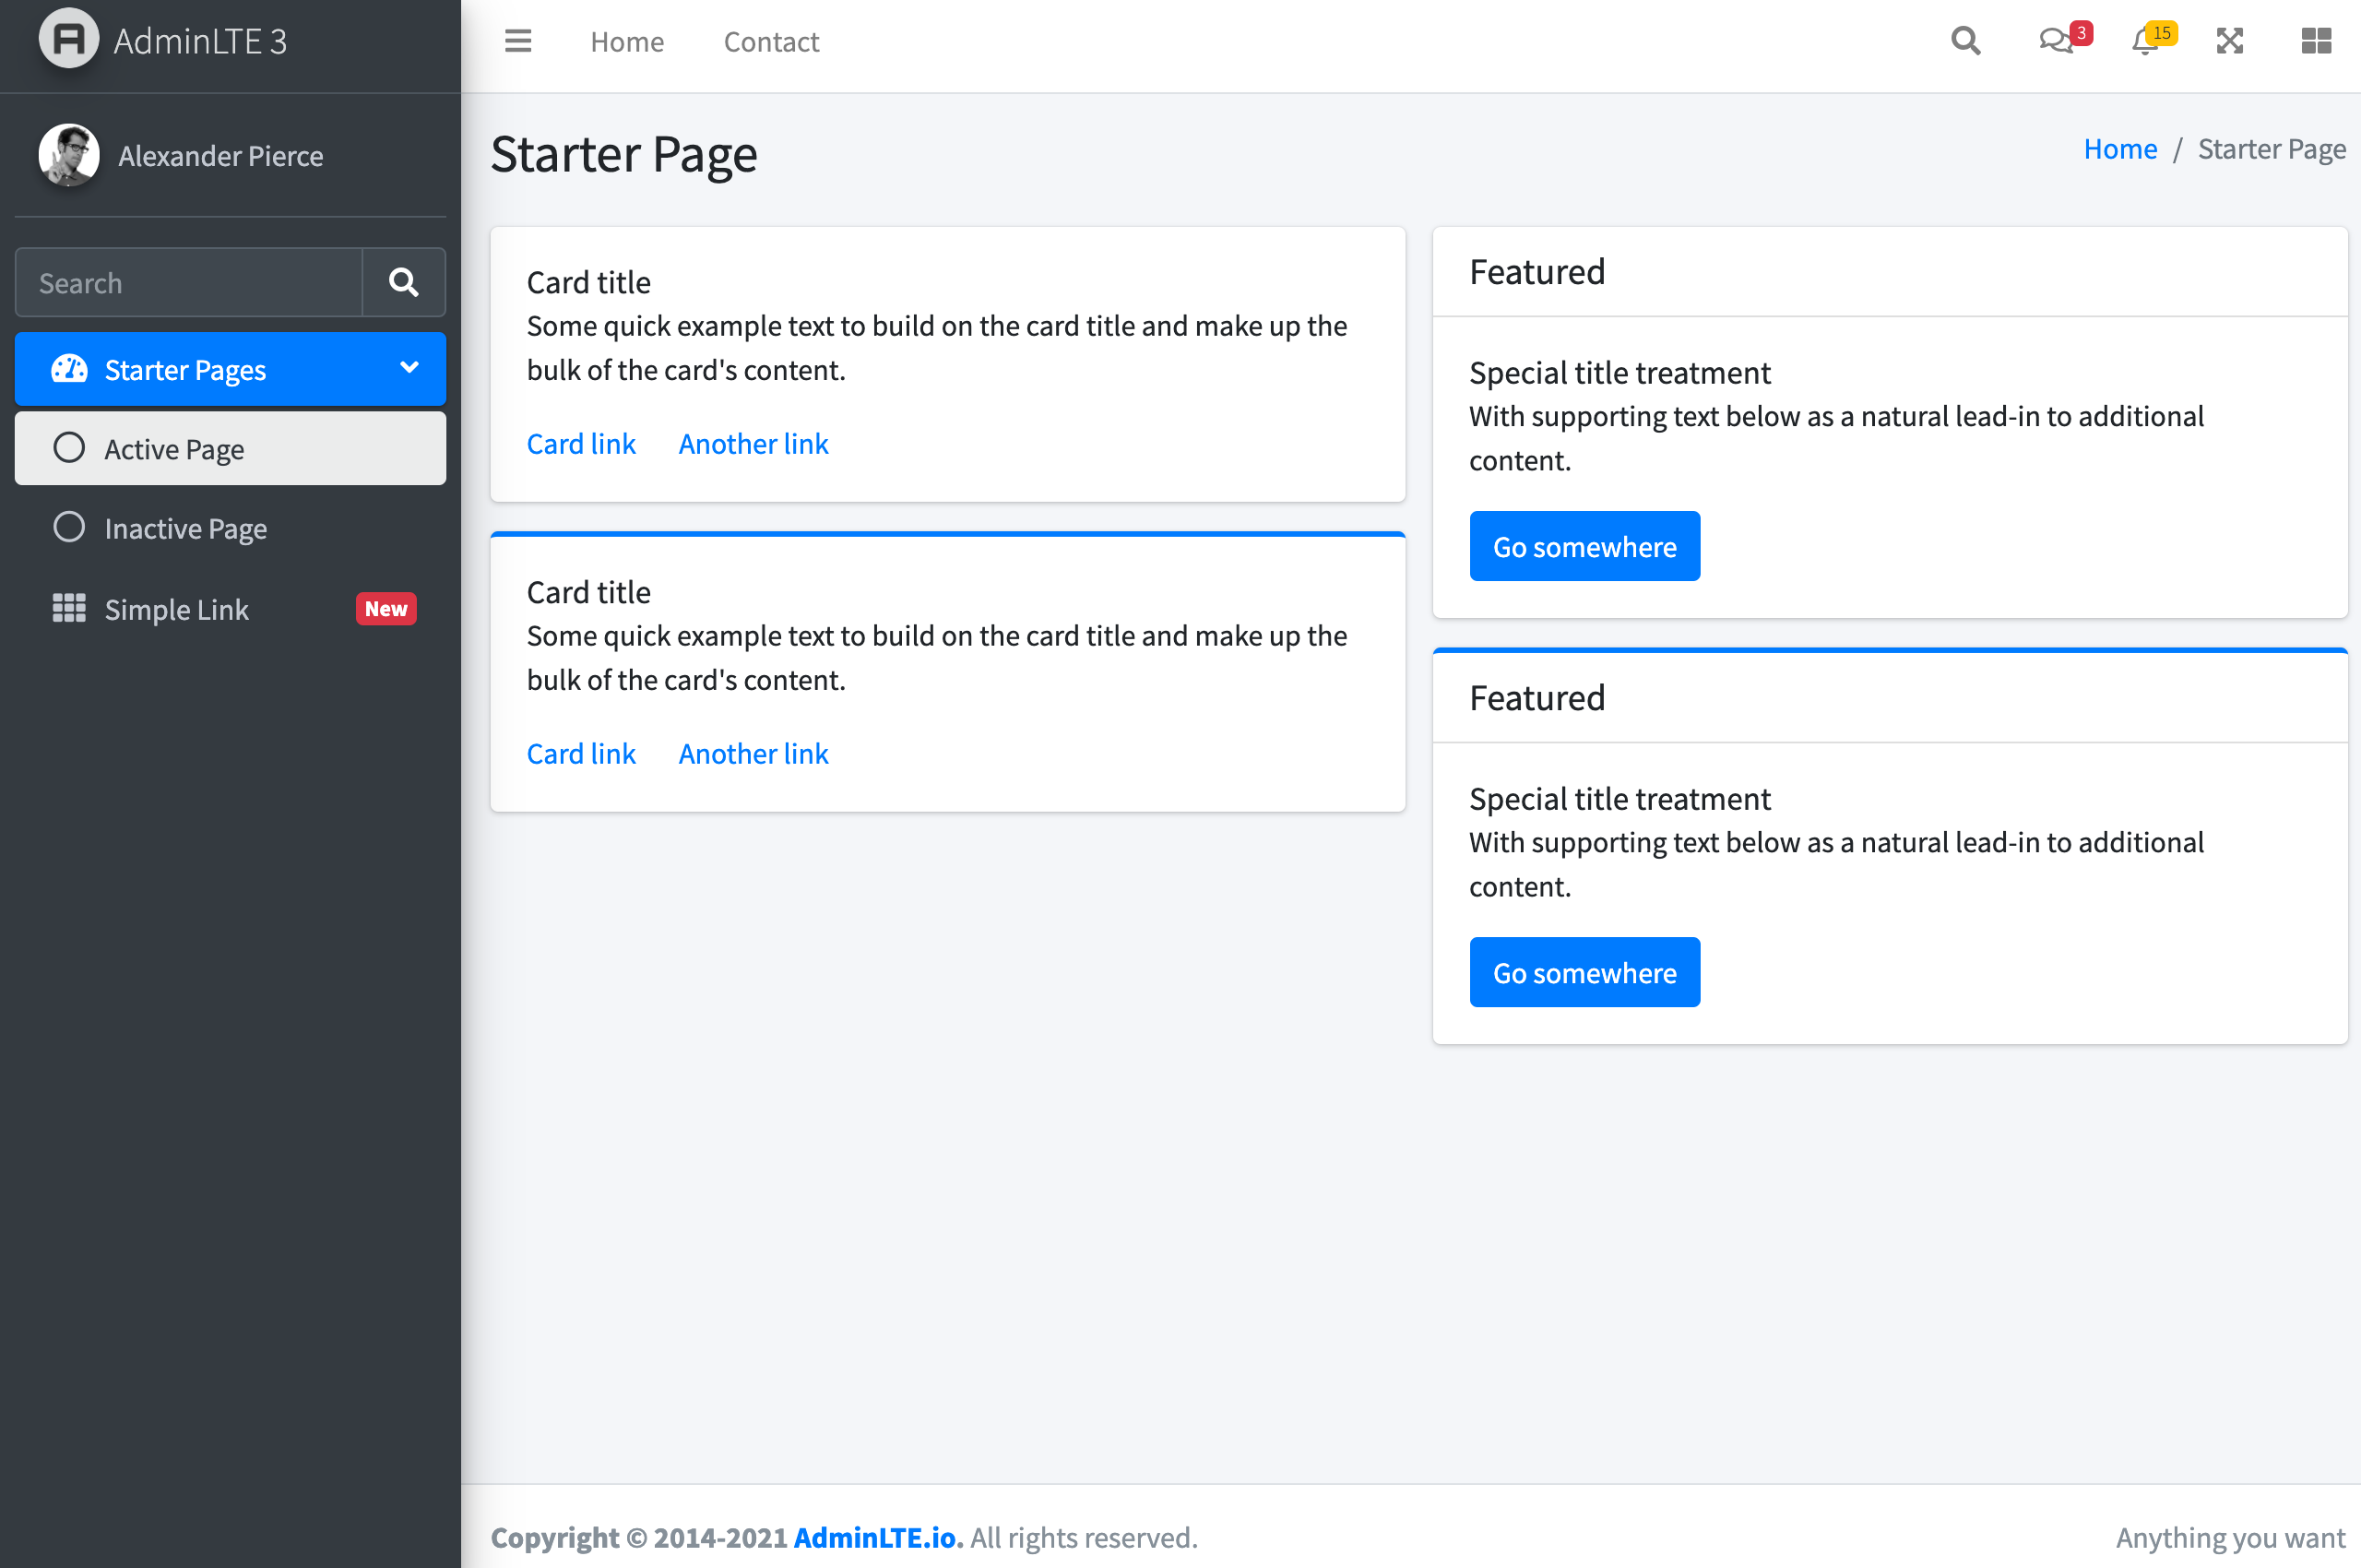
管理画面のイメージ図は、https://adminlte.io/themes/v3/starter.htmlから確認できる。
↓
管理系の事は、管理ディレクトリで管理したい為、ネームスペースを使ってコントローラを作成する
$ rails g controller admin::base
$ rails g controller admin::dashboards
$ rails g controller admin::user_sessions
上記で管理画面全体の設定をする[app/controllers/admin/base_controller.rb]
管理画面へのログイン処理をする[app/controllers/admin/user_sessions_controller.rb]
管理画面ログイン後の画面の処理をする[app/controllers/admin/dashboards_controller.rb]
を作成する。
↓
[app/controllers/admin/base_controller.rb]は、以下のように記述した。
[app/controllers/admin/base_controller.rb]

class Admin::BaseController < ApplicationController
  layout 'admin/layouts/application'
  before_action :check_admin

  private

  def not_authenticated
    redirect_to admin_login_url, info: (t 'defaults.please_login')
  end

  def check_admin
    return if current_user.admin?

    redirect_to root_path, warning: (t 'admin.user_sessions.create.no_admin_message')
  end
end
[app/controllers/admin/base_controller.rb]は、以下のApplicationControllerの内容を継承している。
[not_authenticated]メソッド(sorcery Gemのログインしていなかった時に行われるメソッド)は、親クラスと同じメソッド名でオーバーライドしているので、管理画面でログインしていなかった時は、[app/controllers/admin/base_controller.rb]の[not_authenticated]メソッドが実行される。
管理画面へのログインは、通常のログインと異なり管理者でなければログインできないようにしなければいけないため、[check_admin]メソッドで現在のユーザーが管理者かどうか判定している。
[app/controllers/application_controller.rb]

class ApplicationController < ActionController::Base
  add_flash_types :success, :info, :warning, :danger
  before_action :require_login

  private

  def not_authenticated
    redirect_to login_url, info: (t 'defaults.please_login')
  end
end
管理画面へのログイン処理をするコントローラは、以下のように記述した。
[app/controllers/admin/user_sessions_controller.rb]

class Admin::UserSessionsController < Admin::BaseController
  skip_before_action :require_login, only: %i[new create]
  skip_before_action :check_admin, only: %i[new create]
  layout 'admin/layouts/login'
  def new; end

  def create
    @user = login(params[:email], params[:password])
    if @user
      redirect_to admin_root_url, success: (t 'admin.user_sessions.create.success_message') # 管理者か一般ユーザーかの判定無しに、管理画面へリダイレクトしているが管理画面へは[base_controller.rb](管理者かどうかを判定している)を継承している[dashboards_controller.rb]が担当しているので、一般ユーザーがログインに成功して管理者画面へリダイレクトしても[dashboards_controller.rb]で管理者かどうかを最初に判定しているので、弾かれる。
    else
      flash.now[:danger] = (t 'admin.user_sessions.create.fail_message')
      render :new
    end
  end

  def destroy
    logout
    redirect_to admin_login_url, success: (t 'admin.user_sessions.destroy.message')
  end
end
[app/controllers/admin/user_sessions_controller.rb]は、[app/controllers/admin/base_controller.rb]を継承している。
管理画面へのログイン画面の表示は、一般ユーザーだろうが管理者だろうが表示できるようにしたいので、[skip_before_action]を設定している。
管理画面の中の処理をするコントローラは、以下のように記述した。
[app/controllers/admin/dashboards_controller.rb]

class Admin::DashboardsController < Admin::BaseController
  def index; end
end
[app/controllers/admin/dashboards_controller.rb]は、[app/controllers/admin/base_controller.rb]を継承している。
管理画面の中へは、管理者であって且つログインしている状態でないと入れないようにしたい為、before_action :require_login、before_action :check_adminを設定している。
管理者画面は、一般ユーザーと画面のデザインが違うので一般ユーザーとは違うレイアウトファイルを使用するため、下記のように記載している。
[app/controllers/admin/base_controller.rb]

before_action :check_admin
管理者用のログイン画面のデザインは、管理者画面の中のデザインと異なるため、レイアウトファイルをオーバーライドする事でレイアウトファイルを変えている。
[app/controllers/admin/user_sessions_controller.rb]

layout 'admin/layouts/login'
管理画面の中のデザイン
管理者用のログイン画面
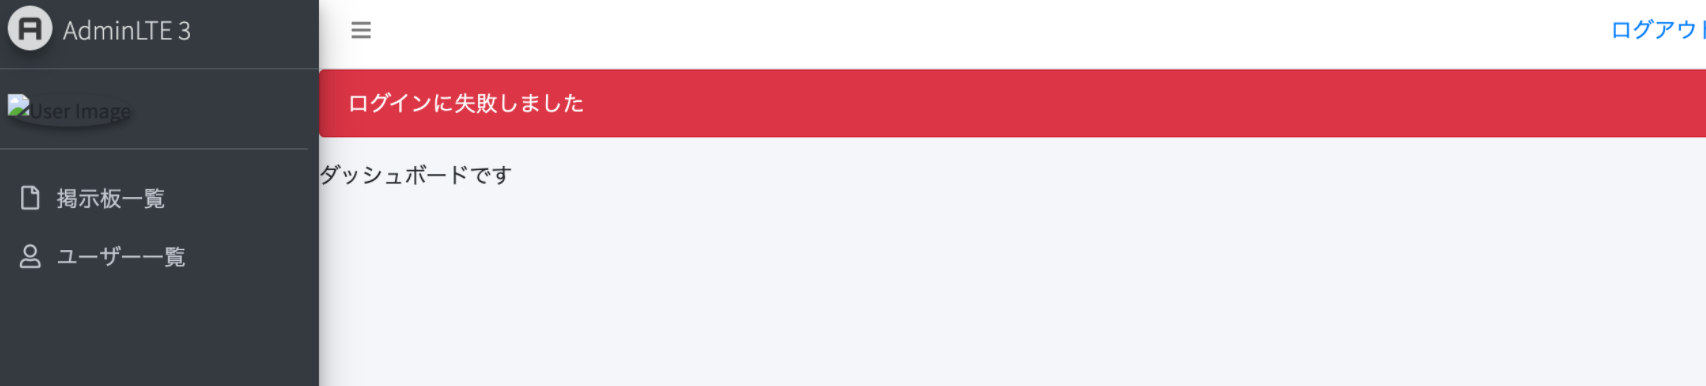
・管理者用のログイン画面で一般ユーザーがログイン: 一般ユーザー用のトップページへリダイレクト
・管理者用のログイン画面で管理者がログイン: 管理者画面の中へリダイレクト
・管理者用のログイン画面でログインが失敗: 管理者用のログイン画面へレンダー
・未ログインの状態で管理者画面の中へ入るのに直接URLを入力: 管理者用のログイン画面へリダイレクト
※
レイアウトファイル: 各ビューファイルにはbodyタグの中身を記述するだけでWEBページを表示できるようにしているのがレイアウトファイル。レイアウトファイルのbodyタグの中のyieldで各ビューファイルの中身を読み込み画面を表示している。レイアウトファイルにheadタグなどを記載している。
↓
レイアウトファイルは、以下のように記述している。
[app/views/admin/layouts/application.html.erb]

<!DOCTYPE html>
<html>
<head>
  <meta charset="utf-8">
  <meta lang='ja'>
  <meta name="viewport" content="width=device-width, initial-scale=1">
  <title><%= page_full_title(yield(:title), admin: true) %></title>
  <%= csrf_meta_tags %>     # クロスサイトリクエストフォージェリ対策で記述されている。
  <%= csp_meta_tag %>       # コンテンツセキュリティポリシー(Content Security Policy: CSP)を実装
  <%= stylesheet_link_tag    'admin', media: 'all' %>
  <%= javascript_include_tag 'admin' %>
  <link rel="stylesheet" href="https://fonts.googleapis.com/css?family=Source+Sans+Pro:300,400,400i,700&display=fallback">
</head>

<body class="hold-transition sidebar-mini layout-fixed">
<div class="wrapper">
  <%= render 'admin/shared/header' %>
  <%= render 'admin/shared/menu' %>

  <!-- Content Wrapper. Contains page content -->
  <div class="content-wrapper">
    <%= render 'shared/flash_message' %>
    <%= yield %>
  </div>
  <!-- /.content-wrapper -->

  <%= render 'admin/shared/footer' %>
</div>

</body>
</html>
[app/views/admin/layouts/login.html.erb]

<html>
  <head>
    <meta charset="utf-8">
    <title><%= page_full_title(yield(:title), admin: true) %></title>
    <%= csrf_meta_tags %>
    <%= csp_meta_tag %>

    <%= stylesheet_link_tag    'admin', media: 'all' %>
    <%= javascript_include_tag 'admin' %>
    <link rel="stylesheet" href="https://fonts.googleapis.com/css?family=Source+Sans+Pro:300,400,400i,700&display=fallback">
  </head>

  <body>
    <div class="hold-transition login-page">
      <%= render 'shared/flash_message' %>
      <%= yield %>
    </div>
  </body>
</html>
下記記載は、マニフェストファイル[app/assets/stylesheets/admin.scss]に記載したものを読み込んでいる。
<%= stylesheet_link_tag 'admin', media: 'all' %>
[app/assets/stylesheets/admin.scss]

@import "admin-lte/plugins/fontawesome-free/css/all.min.css";     # AdminLTEの[starter.html]や[login.html]に記載があるため。
@import "admin-lte/plugins/icheck-bootstrap/icheck-bootstrap.min.css";    # AdminLTEの[login.html]に記載があるため。
@import "admin-lte/dist/css/adminlte.min.css";    # AdminLTEの[starter.html]や[login.html]に記載があるため。
下記記載は、マニフェストファイル[app/assets/javascripts/admin.js]に記載したものを読み込んでいる。
<%= javascript_include_tag 'admin' %>
[app/assets/javascripts/admin.js]

//= require jquery3   #  Bootstrapと依存関係にあるため。
//= require popper   #  Bootstrapと依存関係にあるため。
//= require bootstrap-sprockets   #  Bootstrapと依存関係にあるため。
//= require rails-ujs   # link_toのmethodオプションが使えなくなるため。(これにハマったので注意!!)
//= require admin-lte/plugins/jquery/jquery.min.js   # # AdminLTEの[starter.html]や[login.html]に記載があるため。
//= require admin-lte/plugins/bootstrap/js/bootstrap.bundle.min.js   # # AdminLTEの[starter.html]や[login.html]に記載があるため。
//= require admin-lte/dist/js/adminlte.min.js   # # AdminLTEの[starter.html]や[login.html]に記載があるため。
※ポイント
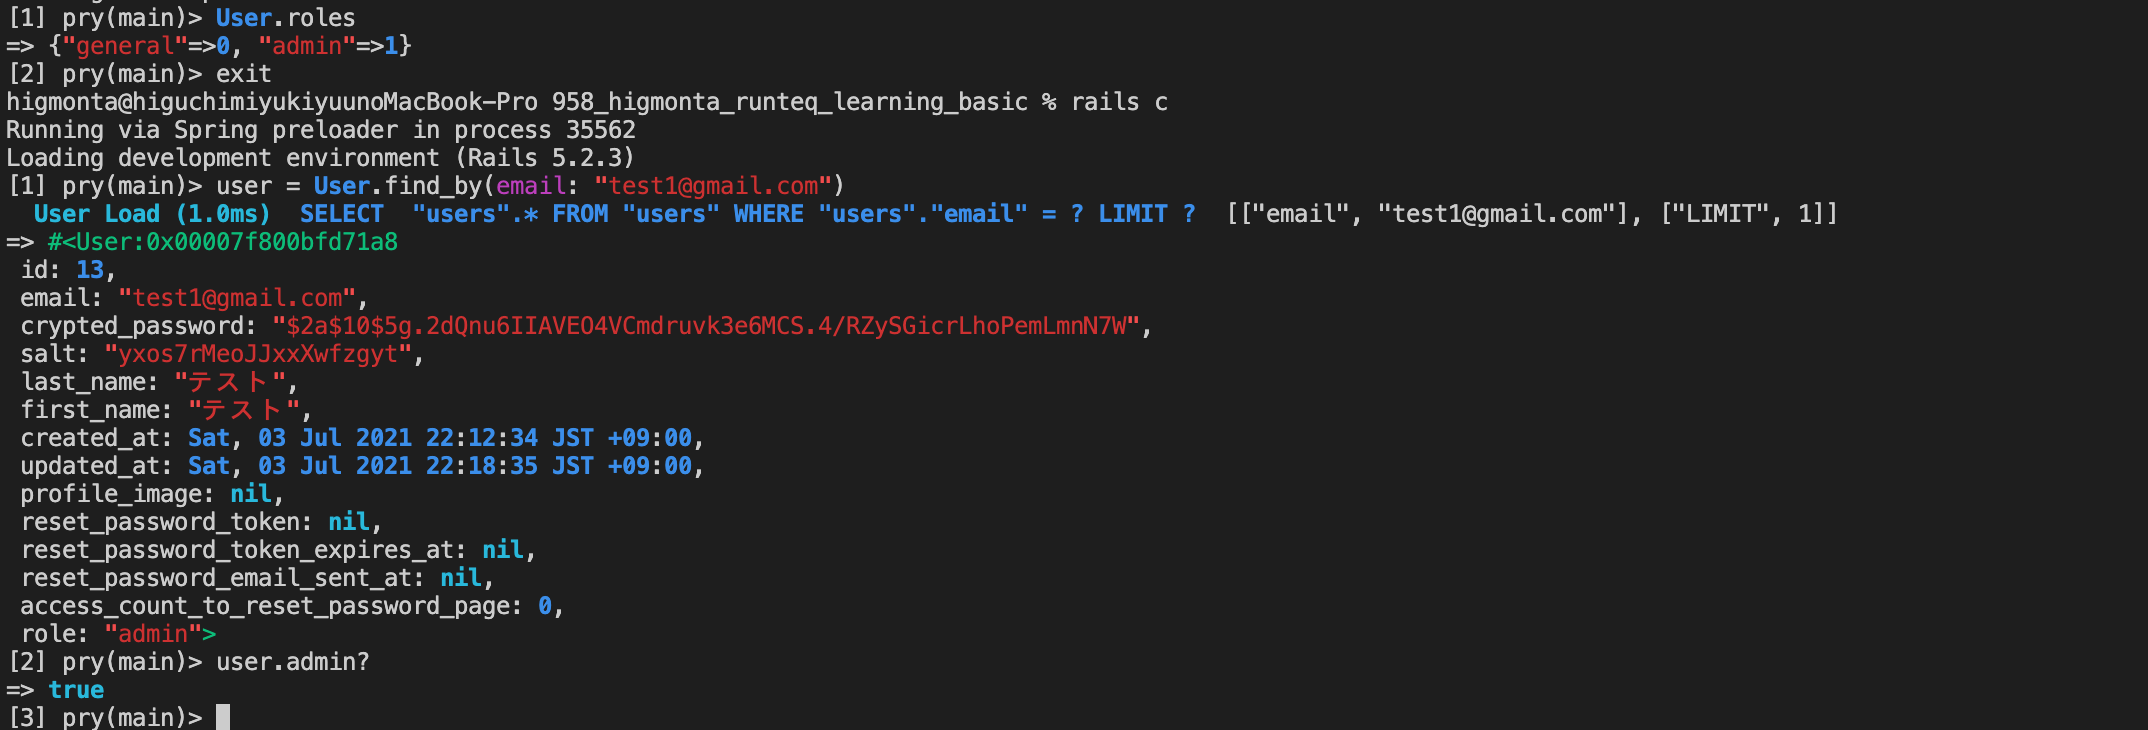
マニフェストファイルに記載した[admin-lte/dist/js/adminlte.min]をどのように探しているのか?(通常は、[node_modules/admin-lte/dist/js/adminlte.min]ではないのか)
これにはRails.application.config.assets.pathsが関係している。
上記コマンドをrails cした画面で打ってみると以下のように出てくる。
[node_modules/]のパスも以下に出てきている。
 上記の出力されたパスの先頭から順に検索([admin-lte/dist/js/adminlte.min]があるか?)する。
上記のパス指定は、[config/initializers/assets.rb]で以下のように記述して追加している。
[config/initializers/assets.rb]

Rails.application.config.assets.paths << Rails.root.join('node_modules')
[app/assets/javascripts/application.js]

//= require jquery3   #  Bootstrapと依存関係にあるため。
//= require popper   #  Bootstrapと依存関係にあるため。
//= require bootstrap-sprockets  #  Bootstrapと依存関係にあるため。
//= require rails-ujs    # link_toのmethodオプションが使えなくなるため。(これにハマったので注意!!)
//= require activestorage
//= require_tree .    # 同じ階層にあるファイルを全て読み込む(読み込む順序は指定できない為、利用しているJSファイルが特定の読み込み順に依存している場合不都合が生じる。)
[app/assets/javascripts/application.js]に上記のように記載されているが、今回は使用するレイアウトファイル毎に読み込むJavaScriptsファイルを変えたいため、下記のように[require_tree .]の=を外してコメントアウトにする。
[app/assets/javascripts/application.js]

//= require jquery3
//= require popper
//= require bootstrap-sprockets
//= require rails-ujs
//= require activestorage
// require_tree .
[require_tree .]の自動読み込みを使わないことにより手動でのプリコンパイルが必要になります。
手動でのプリコンパイルの設定は、以下のようになります。
下記記述のようにプリコンパイルするマニフェストファイル([admin.js],[admin.css])を記載するのは、デフォルトだと[application.scss]や[application.js]のマニフェストファイルしかプリコンパイルされないため。
[config/initializers/assets.rb]

Rails.application.config.assets.precompile += %w[admin.js admin.css]
※
・マニフェストファイル: [application.css]、[application.js]の様な、どのアセットを読み込むか指定するファイル
・アセット: [javascript]、[スタイルシート]、[画像ファイル]といったHTML に付随したファイル
・プリコンパイル: コンパイルできる状態にして配置する的な意味
↓
以下の管理画面とログイン画面をベースに作成したいので、管理画面は、[node_modules/admin-lte/starter.html]をコピーして不要な部分を削除し、ヘッダー、フッター、サイドバーの部分を共通の部分テンプレートとして切り分け、レイアウトファイル[app/views/admin/layouts/application.html.erb]から部分テンプレートを読み込む。
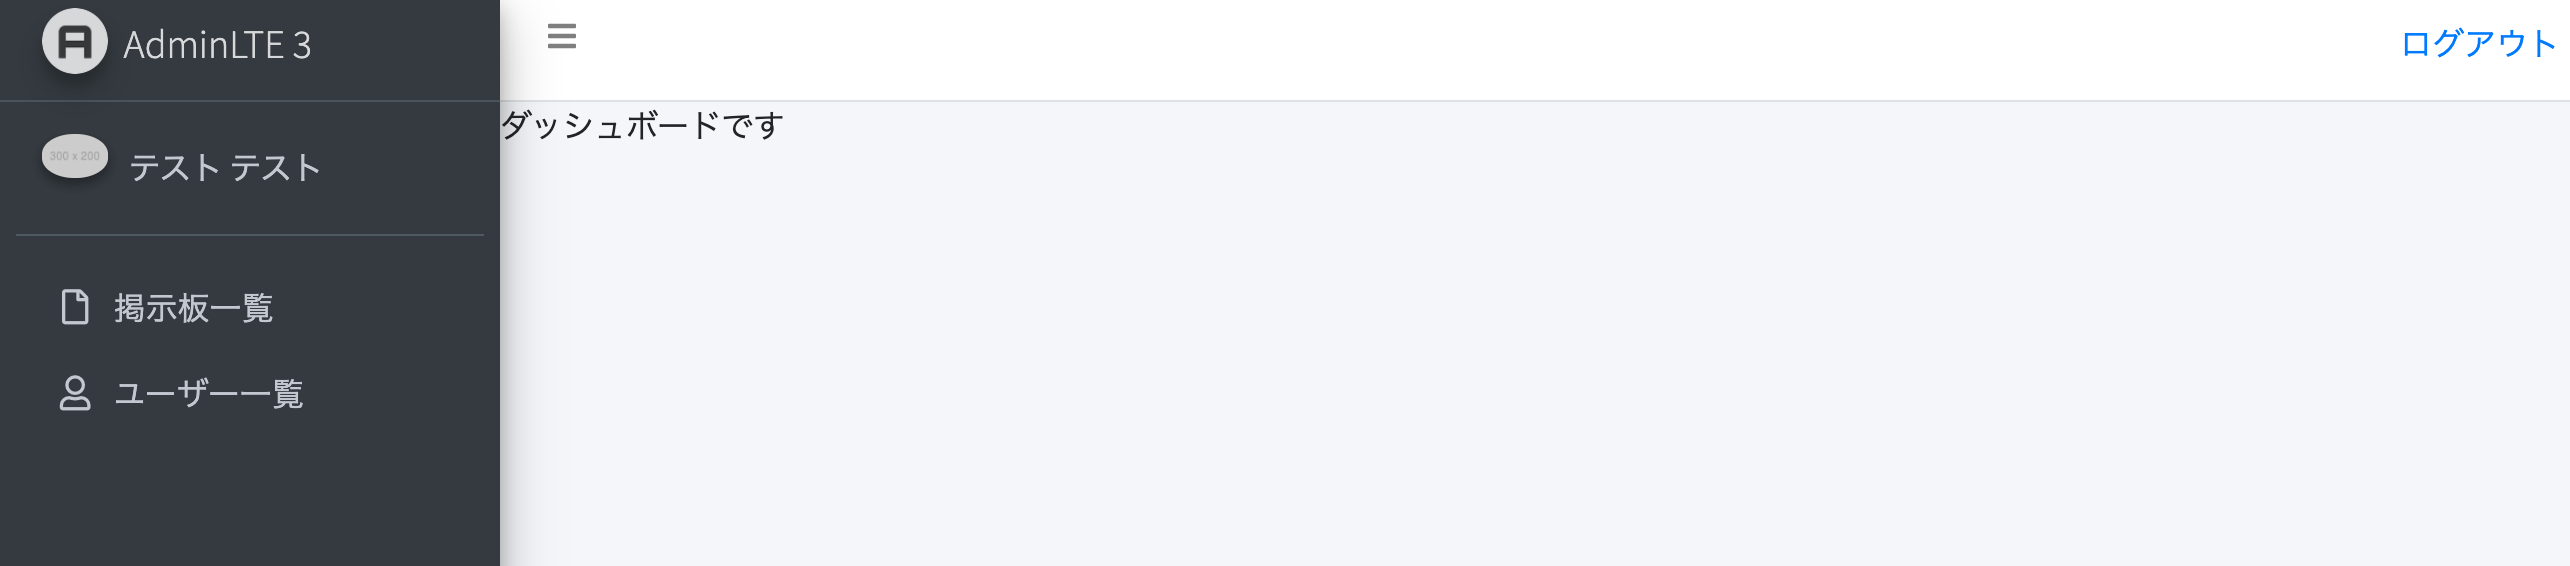
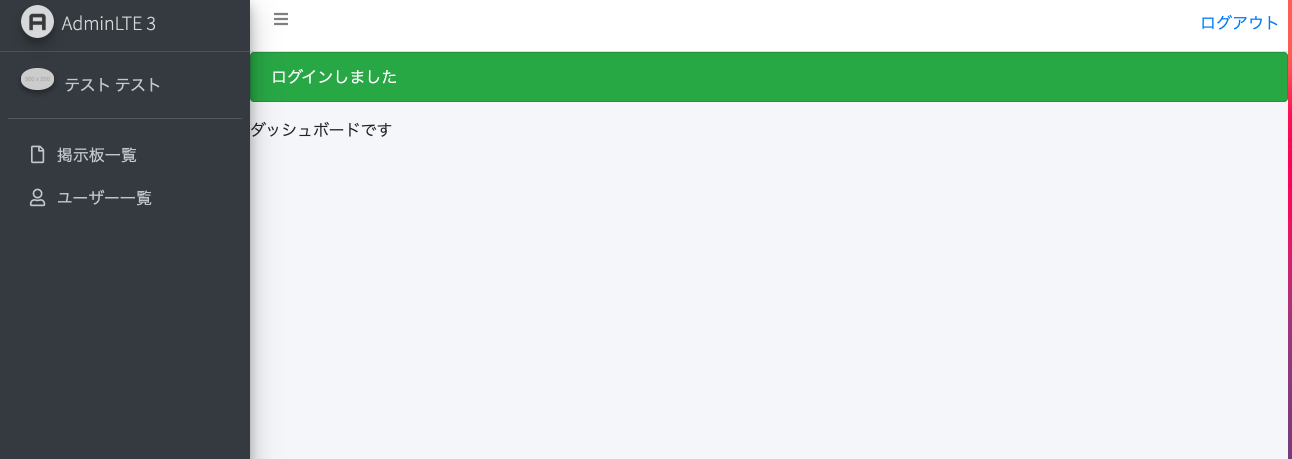
管理画面の中の本文部分は、[app/views/admin/dashboards/index.html.erb]に作成する。
ログイン画面は、[node_modules/admin-lte/pages/examples/login.html]を[app/views/admin/user_sessions/new.html.erb]にコピーして不要な部分を削除し、[app/views/admin/layouts/login.html.erb]のレイアウトファイルから読み込む。
各部分テンプレートとビューファイルは、以下のようになる。
管理画面
ログイン画面
[app/views/admin/dashboards/index.html.erb]

<% content_for(:title, (t 'admin.dashboards.index.title')) %>
<div class="container">
  <div class="row">
    ダッシュボードです
  </div>
</div>
[app/views/admin/shared/_header.html.erb]

<nav class="main-header navbar navbar-expand navbar-white navbar-light">
<!-- Left navbar links -->
<ul class="navbar-nav">
  <li class="nav-item">
    <a class="nav-link" data-widget="pushmenu" href="#" role="button"><i class="fas fa-bars"></i></a>
  </li>
</ul>

<!-- Right navbar links -->
<ul class="navbar-nav ml-auto">
  <!-- Navbar Search -->
  <li class="nav-item">
    <%= link_to (t 'defaults.logout'), admin_logout_path, method: :delete %>
  </li>
</ul>
</nav>
[app/views/admin/shared/_header.html.erb] <footer class="main-footer"> <strong>Copyright ©</strong> All rights reserved. </footer>
[app/views/admin/shared/_menu.html.erb]

<aside class="main-sidebar sidebar-dark-primary elevation-4">
<!-- Brand Logo -->
<a href="index3.html" class="brand-link">
  <img src="https://runteq-board.herokuapp.com/assets/AdminLTELogo-92af06833886bd48cb14b00faa6d70220b3eb7a651f12c5d6f38501ac910dd6b.png" alt="AdminLTE Logo" class="brand-image img-circle elevation-3" style="opacity: .8">
  <span class="brand-text font-weight-light">AdminLTE 3</span>
</a>

<!-- Sidebar -->
<div class="sidebar">
  <!-- Sidebar user panel (optional) -->
  <div class="user-panel mt-3 pb-3 mb-3 d-flex">
    <div class="image">
      <%= image_tag current_user.profile_image.url, class: "img-circle elevation-2", alt: "User Image" %>
    </div>
    <div class="info">
      <a href="#" class="d-block"><%= current_user.decorate.full_name %></a>
    </div>
  </div>

  <!-- Sidebar Menu -->
  <nav class="mt-2">
    <ul class="nav nav-pills nav-sidebar flex-column" data-widget="treeview" role="menu" data-accordion="false">
      <!-- Add icons to the links using the .nav-icon class
           with font-awesome or any other icon font library -->
      <li class="nav-item menu-open">
        <ul class="nav nav-treeview">
          <li class="nav-item">
            <a href="#" class="nav-link">
              <i class="far fa-file nav-icon"></i>
              <p>掲示板一覧</p>
            </a>
          </li>
        </ul>
      </li>
      <li class="nav-item">
        <a href="#" class="nav-link">
          <i class="nav-icon far fa-user"></i>
          <p>
            ユーザー一覧
          </p>
        </a>
      </li>
    </ul>
  </nav>
  <!-- /.sidebar-menu -->
</div>
<!-- /.sidebar -->
</aside>
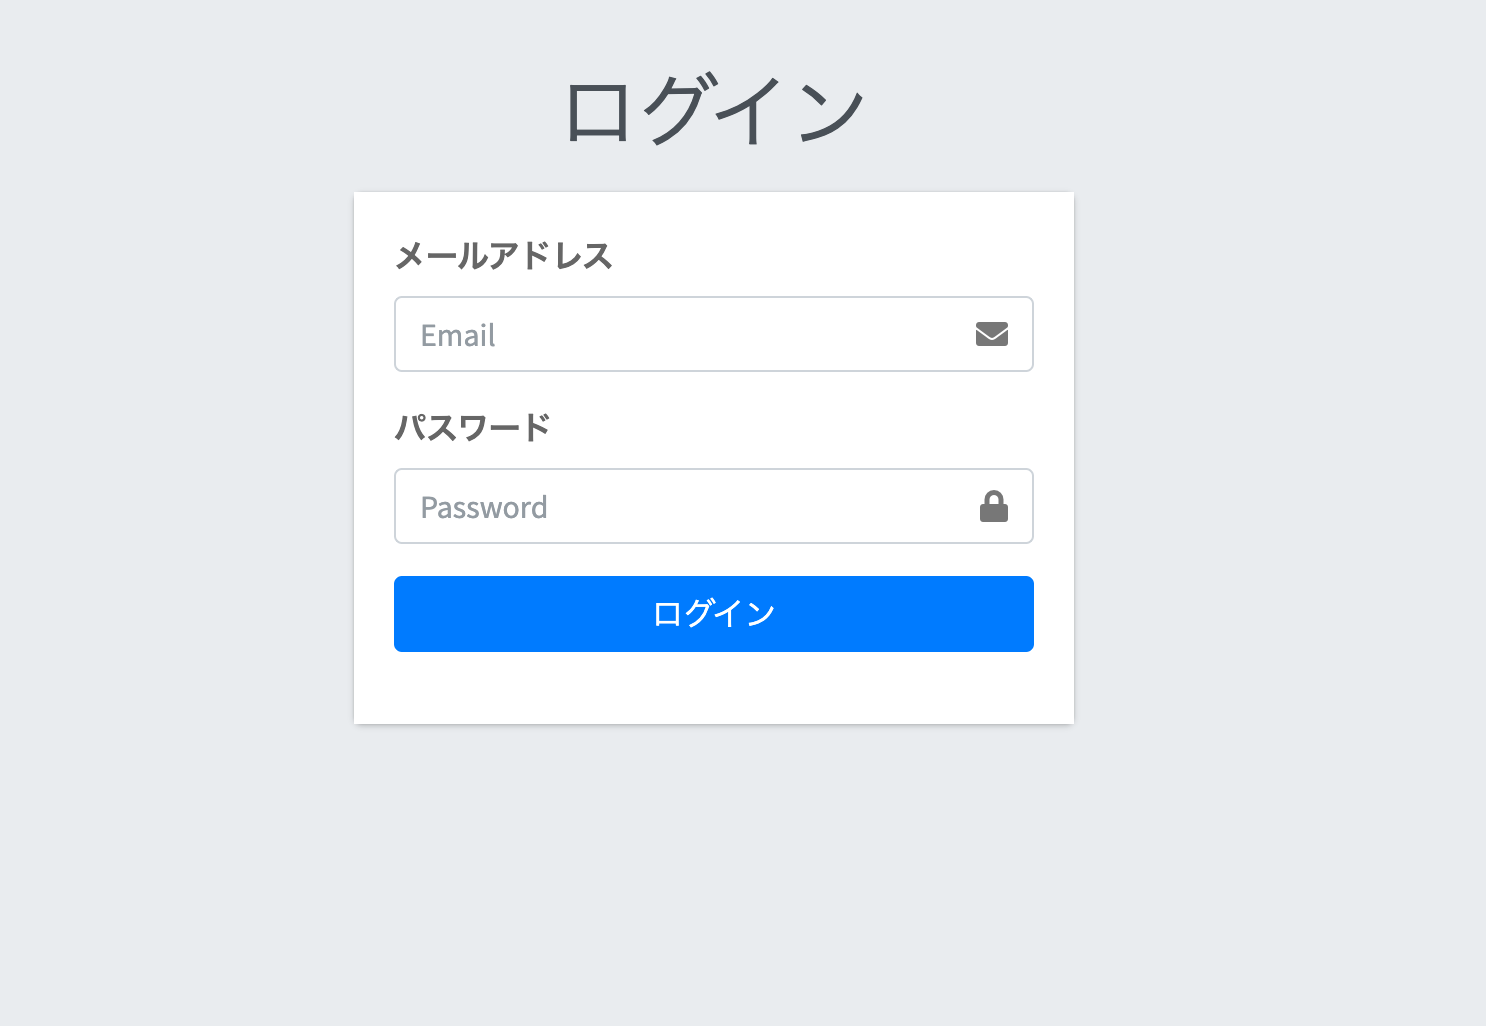
[app/views/admin/user_sessions/new.html.erb]

<% content_for(:title, (t 'admin.user_sessions.new.title')) %>
  <div class="login-box">
    <div class="login-logo">
      <a href="../../index2.html"><h1><%= (t "defaults.login") %></h1></a>
    </div>
    <!-- /.login-logo -->
    <div class="card">
      <div class="card-body login-card-body">

        <%= form_with url: admin_login_path, local: true do |f| %>
          <%= f.label :email, User.human_attribute_name(:email) %>
          <div class="input-group mb-3">
            <%= f.email_field :email, class: "form-control", placeholder: "Email" %>
            <div class="input-group-append">
              <div class="input-group-text">
                <span class="fas fa-envelope"></span>
              </div>
            </div>
          </div>
          <%= f.label :password, User.human_attribute_name(:password) %>
          <div class="input-group mb-3">
            <%= f.password_field :password, class: "form-control", placeholder: "Password" %>
            <div class="input-group-append">
              <div class="input-group-text">
                <span class="fas fa-lock"></span>
              </div>
            </div>
          </div>
            <%= f.submit (t "defaults.login"), class: "btn btn-primary btn-block" %>
        <% end %>
      </div>
    </div>
  </div>
↓
Userモデルに管理者か一般ユーザーかの判断するカラムを追加する(カラムは、integer型でenumを利用する)
$ rails g migration AddRoleUsers
↓
以下のようにマイグレーションファイルを作成
[app/db/migrate ファイル]

  def change
    add_column :users, :role, :integer, default: 0, null: false   # [null: false]で空値を許容していないので、[default: 0]でデフォルトの設定をする
  end
↓
$ rails db:migrate
↓
管理者か一般ユーザーかの判定カラムは、enumを使うので以下のように設定する。
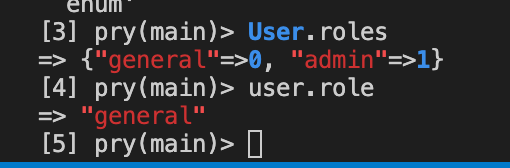
[app/models/user.rb]

  enum role: { general: 0, admin: 1 }
※
enumは、上記の場合DBに実際に保存されるのは[0と1]だがインスタンスの内容は、[generalとadmin]になる
DBに[general]や[admin]のハッシュのkeyを保存しようとすると、実際にはDBにはハッシュのvalueが保存される
enumには、ハッシュで設定した値以外が保存されないというメリットもある
↓
タイトルの表示を管理者画面か一般ユーザー画面かで切り替えるのに以下のように記述している
[app/helpers/application_helper.rb]

  def page_full_title(page_title = '', admin = false)
    base_title = if admin
                   'RUNTEQ BOARD APP(管理画面)'
                 else
                   'RUNTEQ BOARD APP'
                 end
    page_title.empty? ? base_title : page_title + ' | ' + base_title
  end
[app/views/admin/layouts/application.html.erb]

  <title><%= page_full_title(yield(:title), admin: true) %></title>
↓
ルーティングは、以下のように設定している
[config/routes.rb]

  namespace :admin do
    get '/login', to: 'user_sessions#new'
    post '/login', to: 'user_sessions#create'
    delete '/logout', to: 'user_sessions#destroy'
    root to: 'dashboards#index'
  end

※注意
ビュー毎にレイアウトファイルを変えて、指定したビューファイルがレンダーされなくてハマったこと
[app/controllers/admin/user_sessions_controller.rb]

class Admin::UserSessionsController < Admin::BaseController
  skip_before_action :require_login, only: %i[new create]
  skip_before_action :check_admin, only: %i[new create]
  def new
    render layout: 'admin/layouts/login.html.erb'  ②
  end

  def create
    @user = login(params[:email], params[:password])
    unless @user
      flash.now[:danger] = (t 'admin.user_sessions.create.fail_message')
      render :new  ①
      return
    end
    if @user&.role == 'admin'
      redirect_to admin_url, success: (t 'admin.user_sessions.create.success_message')
    elsif @user&.role == 'general'
      redirect_to root_url
    end
  end

  def destroy
    logout
    redirect_to admin_login_url, success: (t 'admin.user_sessions.destroy.message')
  end
end
[app/controllers/admin/base_controller.rb]

class Admin::BaseController < ApplicationController
  layout 'admin/layouts/application'
  add_flash_types :success, :info, :warning, :danger
  before_action :check_admin

  private

  def not_authenticated
    redirect_to admin_login_url
  end

  def check_admin
    unless current_user.admin?
      redirect_to root_path
    end
  end
end
上記のように記述していて①のログインした時にログイン情報に該当するユーザーが存在せず、ログイン画面(newアクション)にレンダーを記述しているのに管理画面の中に入れてしまう
ログを確認すると以下のようになっている。
  Rendering admin/user_sessions/new.html.erb within admin/layouts/application
  Rendered shared/_flash_message.html.erb (0.4ms)
  Rendered admin/user_sessions/new.html.erb within admin/layouts/application (22.8ms)
  Rendered admin/shared/_header.html.erb (1.3ms)
  Rendered admin/shared/_menu.html.erb (0.6ms)
  Rendered shared/_flash_message.html.erb (0.1ms)
  Rendered admin/shared/_footer.html.erb (0.3ms)
ログからも分かるように、レイアウトファイルがapplicationファイルが読み込まれている。(ログイン画面のレイアウトファイルは、②でも指定しているようにloginなはず)
これは、ログイン画面(newアクション)をレンダー(レンダーは、アクションを通らない)しているのでアクションを通らない事により、[Admin::UserSessionsControlle]は[Admin::BaseController]を継承しているので、[Admin::BaseController]ではレイアウトファイルを[application.html.erb]に設定しているので、こちらが適用されるため。
※ポイント
[app/views/admin/layouts/application.html.erb]で、AdminLteに
タグに[layout-fixed]クラスが入っていないのに、タグに[layout-fixed]クラスを付け加えたのは、下記のようにスライダーが途中で途切れてしまうため。[layout-fixed]クラスは、admin-lteというbootstrapのtemplateに設定されているクラス(サイドバーを固定できるクラス)
下記ドキュメント参照
Layout | AdminLTE v3 Documentation
参考記事:
【Rails】AdminLTE3.0.0-alpha.2の利用|Artefact|note
Introduction | AdminLTE 3 Documentation
AdminLTE 3を使って管理者ページを実装しよう - プログラミングの備忘録
[Rails入門] layoutsファイルを分かりやすく解説! | 押さえておきたいWeb知識
コンテンツセキュリティポリシー (CSP) - HTTP | MDN
【Rails】 layoutメソッドの使い方と使い所とは? | Pikawaka - ピカ1わかりやすいプログラミング用語サイト
Railsアプリで Bootstrap 4 を利用する - Qiita
link_toで突然methodが効かなくなって困ってるあなたへ - Qiita
RailsでcssファイルとJavascriptファイルをマニフェストファイルから読み込む | Boys Be Engineer 非エンジニアよ、エンジニアになれ
Railsのマニフェストファイルを使ったJsとStylesheetの呼び出し - Qiita
DIVE INTO CODE(DIC) | 「アセットパイプライン」を学ぼう
Railsで特定のページのみJavaScriptを読み込む方法を現役エンジニアが解説【初心者向け】 | TechAcademyマガジン
Rails 必要なJavaScriptのみを読み込む | | KeruuWeb
https://www.ryotaku.com/entry/2019/02/19/215229
AdminLTEを使って管理者用機能を実装する(トップページ) - Ruby on Rails Learning Diary
パスワードのリセット機能
パスワードのリセット機能
パスワードのリセット機能を実装するのに[sorcery]Gemの[reset_password]モジュール、[config]Gem、[letter_opener]Gemを使用する。
それぞれの役割は、以下のようになる。
[sorcery]Gemの[reset_password]モジュール: パスワードのリセット機能
[config]Gem: 環境毎に違う値を用いたい場合に、その値を分かりやすく管理することができる。
[letter_opener]Gem: 開発環境では、実際にメールを送らずにブラウザ上で送ったメールを確認することができる。
[reset_password]モジュールの利用手順は、以下のようになる。([sorcery]Gemのモジュールを利用するので、[sorcery]Gemの設定も必要。)
$ rails g sorcery:install reset_password --only-submodules
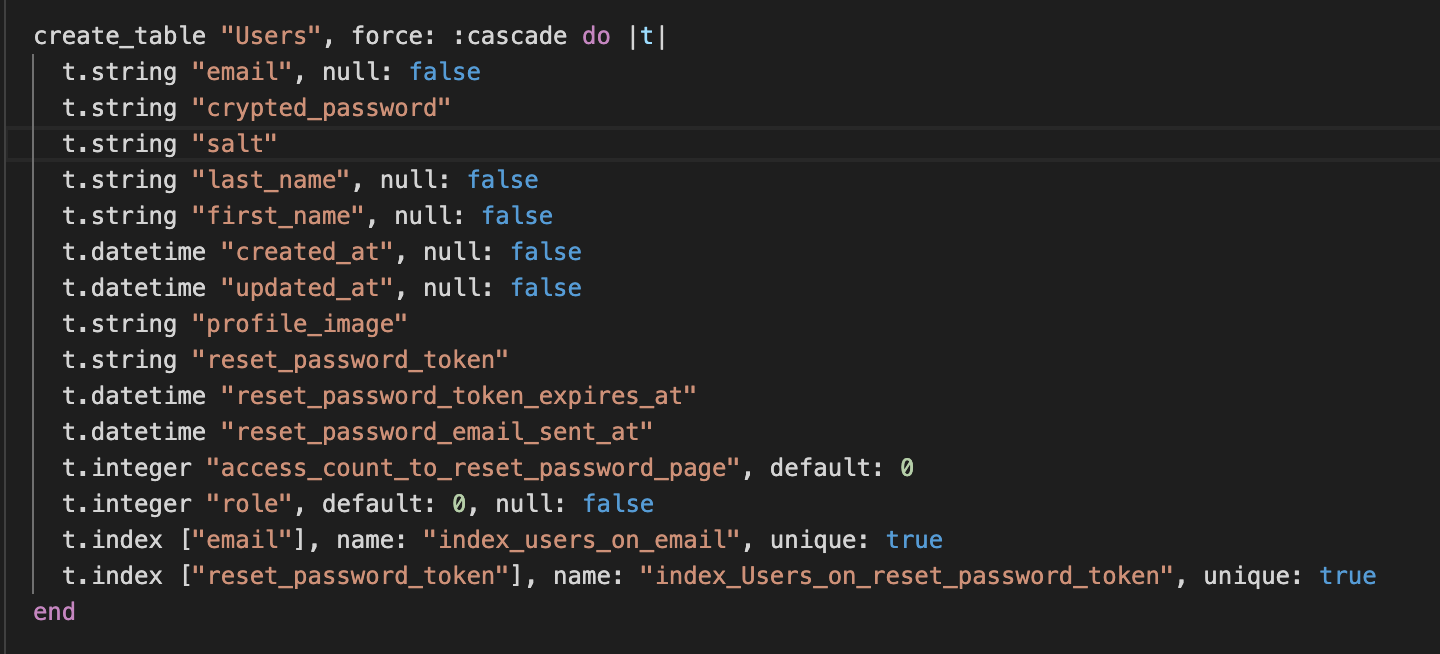
上記を実行するとマイグレーションファイルが自動生成される(自動生成されるマイグレーションファイルの内容が以下のようにUserになっているので、usersに訂正する。)
[db/migrate ファイル]

class SorceryResetPassword < ActiveRecord::Migration[5.2]
  def change
    add_column :Users, :reset_password_token, :string, default: nil, unique: true
    add_column :Users, :reset_password_token_expires_at, :datetime, default: nil
    add_column :Users, :reset_password_email_sent_at, :datetime, default: nil
    add_column :Users, :access_count_to_reset_password_page, :integer, default: 0

    add_index :Users, :reset_password_token
  end
end
上記のようなマイグレーションファイルが作成されるが、[add_column :Users]とユーザーテーブル(Users)が大文字で表示されるが小文字に変える。
↓
$ rails db:migrate
↓
$ rails g mailer UserMailer reset_password_email
上記コマンドで(UserMailerという名前のメーラーとreset_password_emailメソッドを作成)
↓
下記のように生成されたUserMailerのreset_password_emailメソッドに引数としてuserを付け加える。
[app/mailers/user_mailer.rb]

def reset_password_email(user)
↓
下記で使用するメーラーを設定する。
[config/initializers/sorcery.rb]

Rails.application.config.sorcery.submodules = [:reset_password]
Rails.application.config.sorcery.configure do |config|
  config.user_config do |user|
    user.reset_password_mailer = UserMailer      # 使用するメーラーを記載する
  end
end
↓
以下コマンドでパスワードリセットを行うためのコントローラーを作成
$ rails g controller PasswordResets create edit update
↓
上記で作成したコントローラーには、以下のように記述する。([sorcery]GemのgithubのWikiに記載されている)
[sorcery]GemのgithubのWikiには、newアクションは定義されていないが、newのビューも使用する為、記述する。
[app/controllers/password_resets_controller.rb]

# app/controllers/password_resets_controller.rb
class PasswordResetsController < ApplicationController
  # In Rails 5 and above, this will raise an error if
  # before_action :require_login
  # is not declared in your ApplicationController.
  skip_before_action :require_login

  # request password reset.
  # you get here when the user entered their email in the reset password form and submitted it.

  def new; end

  def create
    @user = User.find_by_email(params[:email])

    # This line sends an email to the user with instructions on how to reset their password (a url with a random token)
    @user.deliver_reset_password_instructions! if @user

    # Tell the user instructions have been sent whether or not email was found.
    # This is to not leak information to attackers about which emails exist in the system.
    redirect_to(root_path, :notice => 'Instructions have been sent to your email.')
  end

  # This is the reset password form.
  def edit
    @token = params[:id]
    @user = User.load_from_reset_password_token(params[:id])

    if @user.blank?
      not_authenticated
      return
    end
  end

  # This action fires when the user has sent the reset password form.
  def update
    @token = params[:id]
    @user = User.load_from_reset_password_token(params[:id])

    if @user.blank?
      not_authenticated
      return
    end

    # the next line makes the password confirmation validation work
    @user.password_confirmation = params[:user][:password_confirmation]
    # the next line clears the temporary token and updates the password
    if @user.change_password(params[:user][:password])
      redirect_to(root_path, :notice => 'Password was successfully updated.')
    else
      render :action => "edit"
    end
  end
end
上記の記載でも動くが、[rubocop]を通過するように記載すると以下のようになる。
[app/controllers/password_resets_controller.rb]

class PasswordResetsController < ApplicationController
  # In Rails 5 and above, this will raise an error if
  # before_action :require_login
  # is not declared in your ApplicationController.
  skip_before_action :require_login

  # request password reset.
  # you get here when the user entered their email in the reset password form and submitted it.

  def new; end

  def create
    @user = User.find_by(email: params[:email])

    # This line sends an email to the user with instructions on how to reset their password (a url with a random token)
    @user&.deliver_reset_password_instructions! if @user   # メーラーにメールの送信指示を出す+トークンを発行して、DBに保存している


    # Tell the user instructions have been sent whether or not email was found.
    # This is to not leak information to attackers about which emails exist in the system.
    redirect_to login_path, success: (t '.message')
  end

  # This is the reset password form.
  def edit
    @token = params[:id]
    @user = User.load_from_reset_password_token(@token) # # トークンを使ってユーザーを見つけ、有効期限もチェックし、トークンが見つかり有効であれば、ユーザーを返す。

    return if @user.present?    # ①

    not_authenticated  # 該当のユーザーが存在しなかった場合にroot_pathへリダイレクトされる。
  end

  # This action fires when the user has sent the reset password form.
  def update
    @token = params[:id]
    @user = User.load_from_reset_password_token(@token)   # トークンでユーザーを見つけ、有効期限もチェックします。トークンが見つかり、有効であればユーザーを返します。

    if @user.blank?
      not_authenticated
      return
    end

    # the next line makes the password confirmation validation work
    @user.password_confirmation = params[:user][:password_confirmation]
    # the next line clears the temporary token and updates the password
    if @user.change_password(params[:user][:password])   # トークンをクリアして、ユーザーの新しいパスワードを更新する。
      redirect_to login_path, success: (t '.message')
    else
      flash.now[:danger] = (t '.fail')
      render :edit
    end
  end
end
①の部分は、github記載の記述だとrubocopに引っかかってしまうので、rubocopに引っかからないように書き換えた。
(rubocopにガード節を使えと言われる。)
ガード節: 条件分岐の際に処理の対象にならない条件はネスト化を防ぐために最初の段階で条件処理から外すようにする事。(例えば、@userが存在しない時だけの処理を書く際は、@userが存在する場合は最初の段階でreturnして処理の対象から外すという事。)
    return if @user.present?

    not_authenticated

#上記で@userが存在する時(@user.present?がtrueの時は、return処理される)は、処理を抜けて、@userが存在しない時(@user.present?がfalseの時は、not_authenticatedに処理が流れる)は、not_authenticatedに処理が流れる。
↓
以下のようにルーティングを定義する。
(githubには、newアクションのルーティングが定義されていないが使用するため記述する。)
[config/routes.rb]

resources :password_resets, only: %i[new create edit update]
↓
使用するメーラーに以下のように記載する。
[app/mailers/user_mailer.rb]

class UserMailer < ApplicationMailer
  def reset_password_email(user)
    @user = User.find user.id
    @url  = edit_password_reset_url(@user.reset_password_token)    # 送るメール本文に使うURLをインスタンス変数に格納している。(送るURLには、URLの最後にトークンを付け加えている。createアクションでトークンが発行されDBにトークンが保存されているので、それを利用している。)
    mail(to: user.email,
         subject: (t 'defaults.subject'))
  end
end
↓
送るメール本文を以下のファイルに以下のような例で記述する。
[app/views/user_mailer/reset_password_email.html.erb]

<p><%= @user.decorate.full_name %> 様</p>
<p>===============================================</p>
<p>パスワード再発行のご依頼を受け付けました。</p>
<p>こちらのリンクからパスワードの再発行を行ってください。</p>
<p><%= @url %></p>
[app/views/user_mailer/reset_password_email.text.erb]

<%= @user.decorate.full_name %> 様
<p>===============================================</p>
パスワード再発行のご依頼を受け付けました。
こちらのリンクからパスワードの再発行を行ってください。
<%= @url %>
上記のようにhtmlファイルとtextファイルを両方記述するのは、htmlに対応している端末ではhtmlメールのデータを送り、htmlに対応していない端末では、textメールのデータを送ることが出来るようにするため。
上記のような受信者の環境によって表示するメールの形式が変わるものをマルチパートメールという。
上記のメール本文は、以下のファイルの[yield]部分に読み込まれて、メールが送られる。
[app/views/layouts/mailer.html.erb]

<!DOCTYPE html>
<html>
  <head>
    <meta http-equiv="Content-Type" content="text/html; charset=utf-8" />
    <style>
      /* Email styles need to be inline */
    </style>
  </head>

  <body>
    <%= yield %>
  </body>
</html>
↓
発行されたトークンがUsersテーブルのreset_password_tokenカラムに保存される時は、お互いのトークンがユニークでなければならないのと、パスワード変更時にはDBのreset_password_tokenからトークンが削除されるため、このままではユニーク制約に引っかかってしまう為、[allow_nil: true]を付与する事で、対象の値がnilの場合は、バリデーションをスキップするようにする。
↓
パスワードのリセット申請画面(メールアドレスを入力して、入力したメールアドレスにパスワードリセットの詳細が届く。)のビューファイルは、以下のようにした。
[app/views/password_resets/new.html.erb]

<% content_for(:title, (t '.title')) %>
<div class="container">
  <div class="row">
    <div class="col-lg-8 offset-lg-2">
      <h1><%= (t '.title') %></h1>
      <%= form_with url: password_resets_path, local: true do |f| %>  # 入力したメールアドレスをDBに保存するわけではないので、modelを渡さず、urlでパラメーターのアクション先(createアクション)を指定している。
      <div class="form-group">
        <%= f.label :email, (t '.email') %>
        <%= f.email_field :email, class: 'form-control' %>
      </div>
      <%= f.submit '送信', class: 'btn btn-primary' %>
      <% end %>
    </div>
  </div>
</div>
↓
送られてくるメールには、PasswordResetsControllerのeditアクションに対応するURL(トークン付き)が記載されており、
そのメール本文のURLをクリックした時のビューファイル(editアクションに対応するビューファイル)は、以下のように記載した。
[app/views/password_resets/edit.html.erb]

<% content_for(:title, (t '.title')) %>
<div class="container">
  <div class="row">
    <div class="col-lg-8 offset-lg-2">
      <h1><%= (t '.title') %></h1>
      <p><%= User.human_attribute_name(:email) %></p>
      <p><%= @user.email %></p>
      <%= form_with model: @user, url: password_reset_path(@token), local: true do |f| %>  # 新しいパスワードをDBに保存するので、Userモデルのインスタンスをmodel: @userで渡して、自動生成されるパラメーターの行き先のURLと実際にパラメーターを送りたいURLが違うので、urlでパスを指定している。
        <%= render 'shared/error_messages', object: f.object %>
        <div class="form-group">
          <%= f.label :password %>
          <%= f.password_field :password, class: 'form-control' %>
        </div>
        <div class="form-group">
          <%= f.label :password_confirmation, (t '.password_confirmation') %>
          <%= f.password_field :password_confirmation, class: 'form-control' %>
        </div>
        <div class="text-center">
          <%= f.submit class: 'btn btn-primary' %>
        </div>
      <% end %>
    </div>
  </div>
</div>
※ポイント
上記の流れを簡略化すると以下のような流れになる。
①パスワードリセットのリンクをユーザーがクリック
↓
②PasswordResetsControllerのnewアクションでパスワードリセットの申請画面が開く
↓
③パスワードリセットの申請画面にメールアドレスを入力して送信すると、PasswordResetsControllerのcreateアクションが処理をして、[トークンの発行・トークンをDBに保存・メーラーにメール送信の指示を出す]
↓
④設定したメーラーのアクションが処理をして、アクション内の処理によってメールを送信(送信されるメールは、[メーラー名/メーラー内で記載したアクション名]に対応するビューファイルが[app/mailers/application_mailer.rb]のyeild部分に読み込まれて送信される。)
メーラーと送信されるメールのビューファイルの関係は、コントローラーとビューファイルの関係と似ている。
↓
⑤送られてきたメール本文のURLをクリックするとPasswordResetsControllerのeditアクションが処理をして、パスワードリセット画面が表示される。
URLにトークンが記載されているので、どのユーザーがパスワードを変更しようとしているかが分かる。
↓
⑥パスワードリセット画面に新しいパスワードを入力して更新をクリックすると、PasswordResetsControllerのupdateアクションが処理をして、パスワードが変更される。(このパスワードが変更されるタイミングでDBに保存されているトークンは、削除される。)
[config]Gemの利用手順は、以下のようになる。
Gemfileに以下のように記載する。
↓
[Gemfile]

gem 'config'
↓
$ bundle install
↓
下記コマンドを実行して、環境毎に利用する値を保存するファイルを作成する。
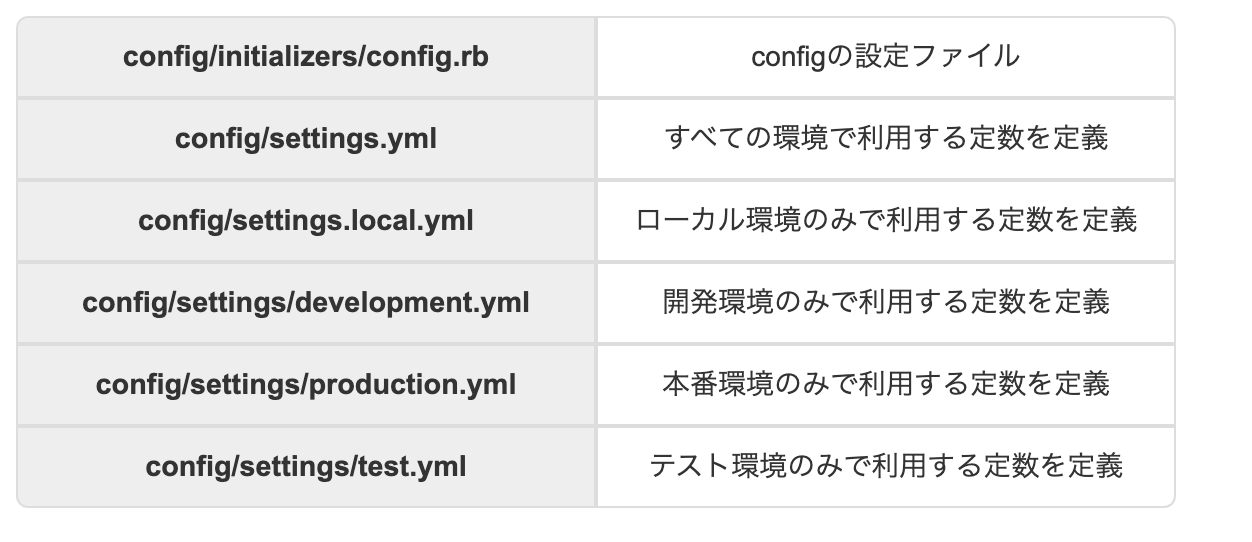
$ rails g config:install
上記コマンドで作成された各ファイルの役割は、以下のようになる。
また、[rails g config:install]を実行することで、以下のように[.gitignore]ファイルに追加される。
[.gitignore]

config/settings.local.yml
config/settings/*.local.yml
config/environments/*.local.yml
[config/settings.local.yml]ファイルは、Gitの管理から外れているので、共有したくない事は、こちらに定義する。
↓
test環境とdevelopment環境でhost情報を変えたいので、以下のように記載することで[config]Gemを用いて各環境での設定の値を管理できる。
[config/enviroments/development.rb]

  config.action_mailer.delivery_method = :letter_opener_web
  config.action_mailer.default_url_options = Settings.default_url_options.to_h   # host情報の設定([config/settings/development.yml]ファイルに記載してあるものを読み込んでいる)
[config/enviroments/test.rb]

  config.action_mailer.default_url_options = Settings.default_url_options.to_h # host情報の設定([config/settings/test.yml]ファイルに記載してあるものを読み込んでいる)
[config/settings/development.yml]

default_url_options:
  host: 'localhost:3000'
[config/settings/test.yml]

default_url_options:
  host: 'localhost:3000'
※ポイント
・[config/settings/development.yml]や[config/settings/test.yml]のファイル名が[Settings]になっているのは、以下のように記述があり設定されている為。
[config/initializers/config.rb]

  config.const_name = 'Settings'
・[config/enviroments/development.rb]や[config/enviroments/test.rb]でhost情報を設定するのに[Settings.default_url_options.to_h]と[.to_h]と記載することにより、yaml形式をハッシュ形式で読み込むことができる。
以下に検証結果を記載します。
[config/settings/development.yml]

default_url_options:
  host1: 'localhost:3000'
  host2: 'localhost:3001'

[letter_opener]Gemの利用手順は、以下のようになる。
Gemfileに以下のように記述する。
[Gemfile]

group :development do
  gem 'letter_opener_web', '~> 1.0'
end
↓
$ bundle install
↓
[letter_opener]Gem用のルーティングを以下のように記載する。
[config/routes.rb]

  mount LetterOpenerWeb::Engine, at: '/letter_opener' if Rails.env.development?
  resources :password_resets, only: %i[new create edit update]
↓
以下のように各設定をする。
[config/environments/development.rb]

  config.action_mailer.delivery_method = :letter_opener_web   # 配信方法を設定。
  config.action_mailer.default_url_options = Settings.default_url_options.to_h   # host情報の設定(Settings.default_url_options.to_hでhost情報を取得できない時は、以下のように直接記述する)
config.action_mailer.default_url_options = { host: 'localhost:3000' }
↓
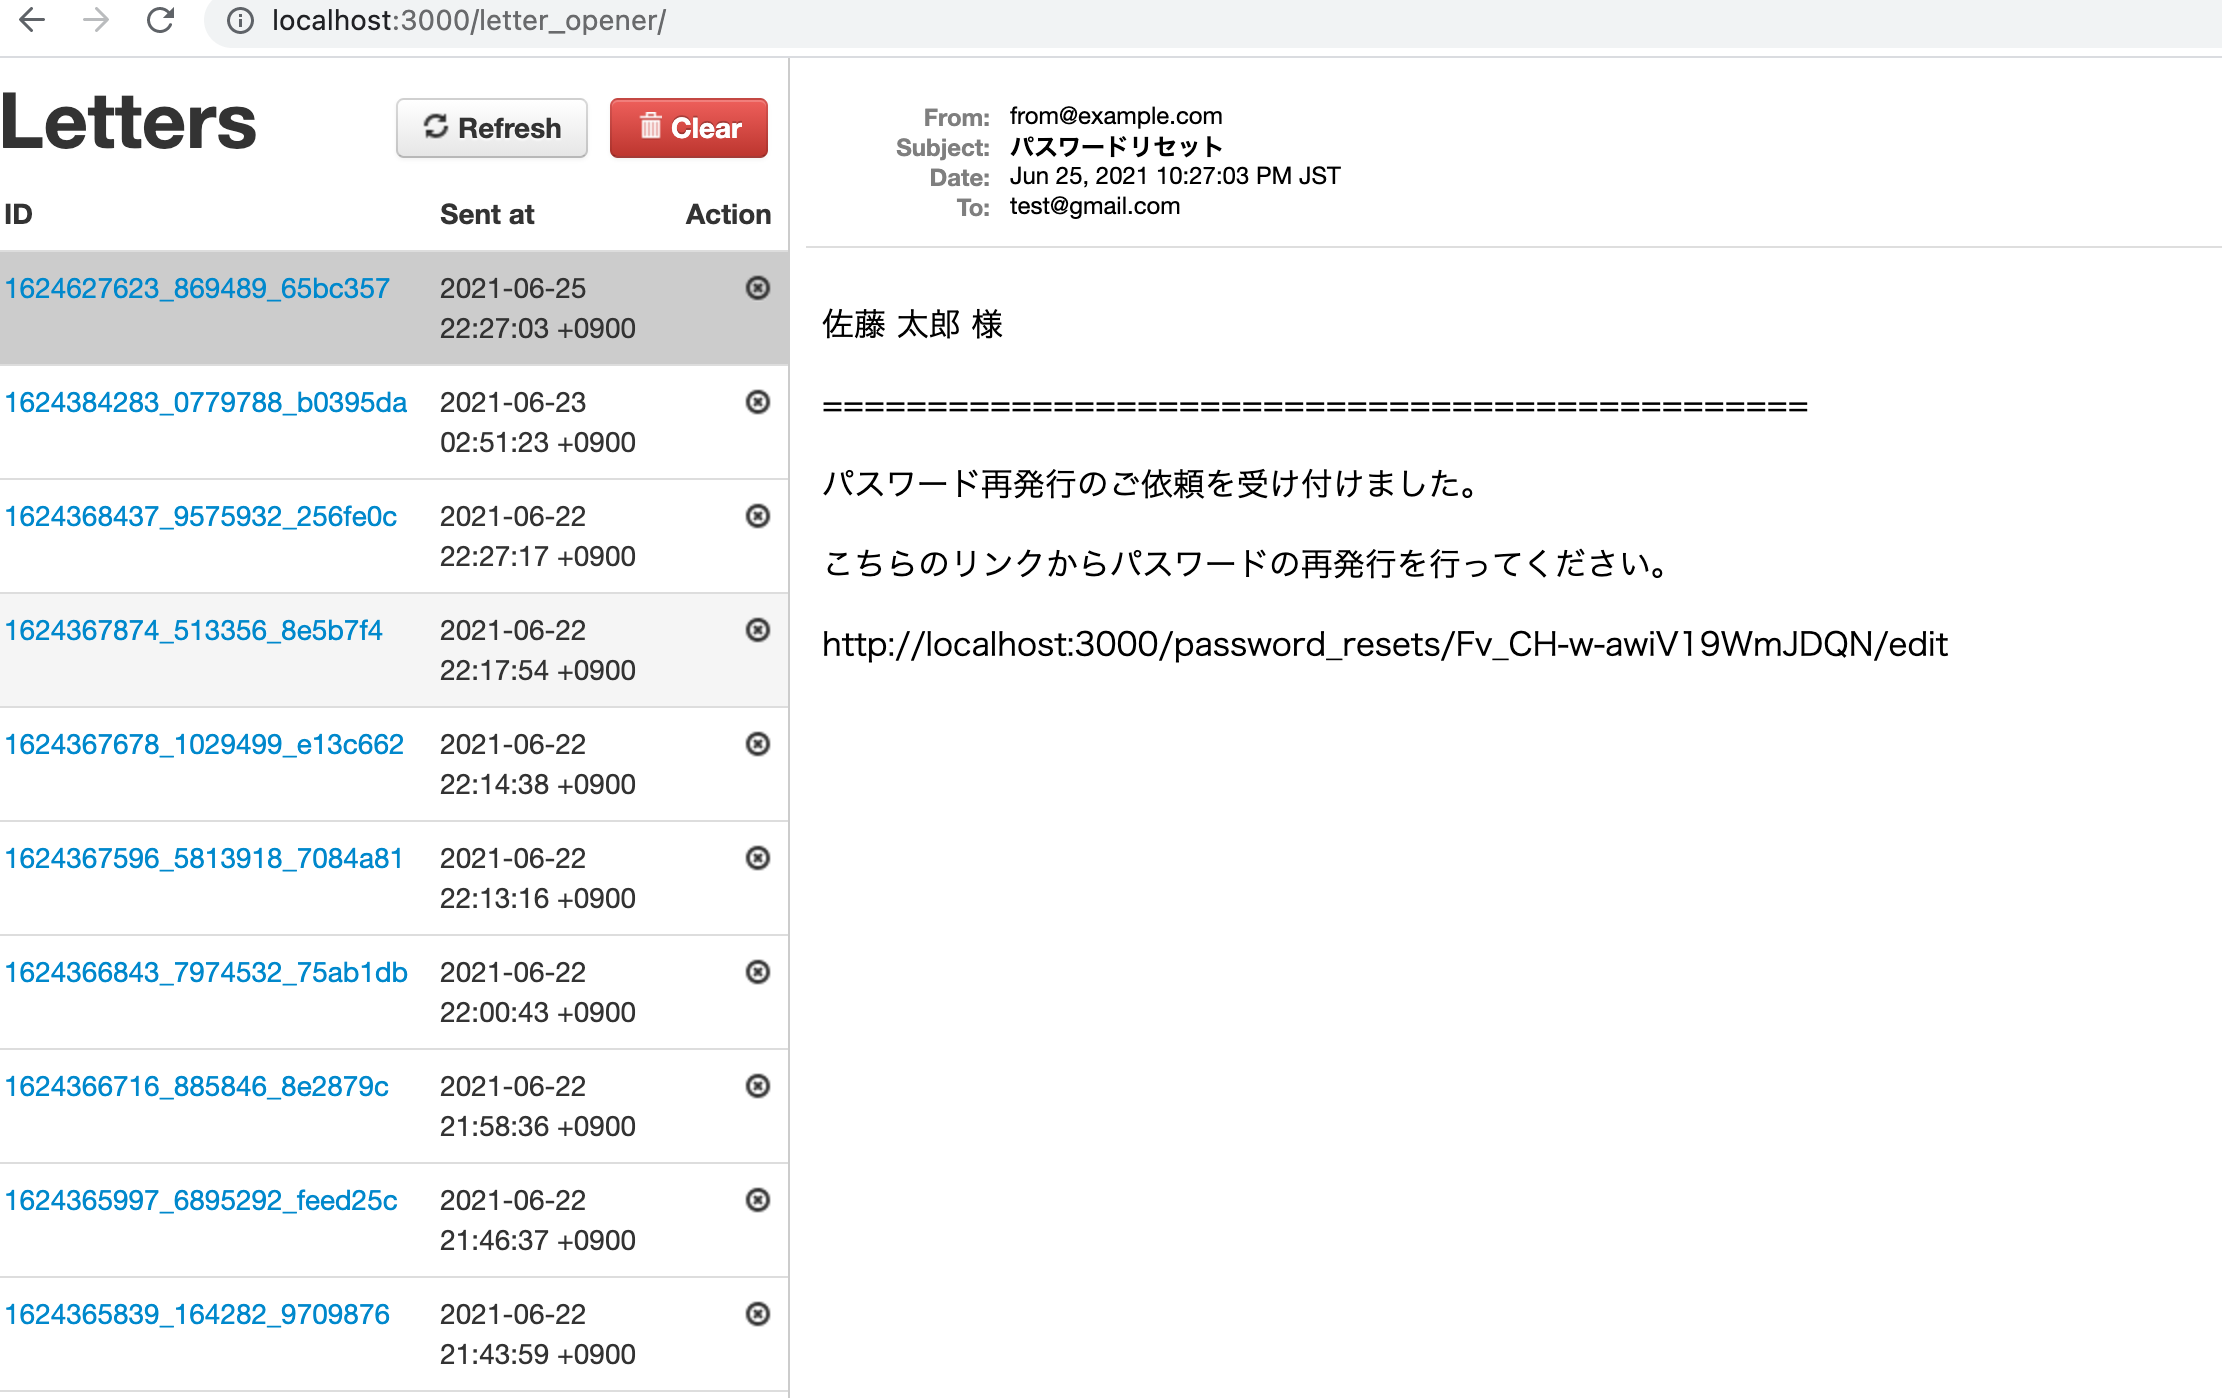
メール送信後http://localhost:3000/letter_openerにアクセスすると、下記のようにブラウザ上で送信したメールの受信内容が確認できる。
※ポイント
・アプリケーションのhost情報をメーラー内で使う為、host情報を設定しなくちゃいけない。
参考記事:
マルチパートメールって何?メルマガ配信で使う方法も公開します! | メール配信システム「blastmail」Offical Blog
【Rails】パスワード変更(トークンがどのように使用されているのか) - Qiita
https://yuta-blog.tokyo/rubocop-guardclause/
Rubyでreturnを使って条件分岐をシンプルに書く方法 - Qiita
sorceryのパスワードリセットを実装(reset_passwordモジュール) - Qiita
【Rails】パスワード変更(トークンがどのように使用されているのか) - Qiita
[Ruby on Rails]sorceryによる認証 – (7)APIでのパスワードリセット | DevelopersIO
Rails sorcery パスワードリセット機能の実装.|いずは. フォロバ100%します.毎朝7時.|note
Railsで、Action Mailerとletter_opener_webを初めて使いました - めるノート
【Rails】letter_opener_webを用いて開発環境で送信したメールを確認する方法|TechTechMedia
値渡し・参照渡し・参照の値渡し
値渡し・参照渡し・参照の値渡しとは?
[値渡し・参照渡し・参照値渡し]について分かりやすいサイトがあったので、そちらの記事を載せさせていただきます。
railsで以下のような検証を行うと、[参照渡し]が実感できます。
[1] pry(main)> a = "1234"
=> "1234"
[2] pry(main)> b = a
=> "1234"
[3] pry(main)> b.reverse!
=> "4321"
[4] pry(main)> a
=> "4321"
また以下のように値を再度代入した場合は、違うメモリを参照するので、代入元は影響を受けない。
[1] pry(main)> a = "1234"
=> "1234"
[2] pry(main)> b = a
=> "1234"
[3] pry(main)> b = "4321"
=> "4321"
[4] pry(main)> a
=> "1234"
railsが値参照により実際にアプリケーションに影響を与えてしまう例を以下に記載します。
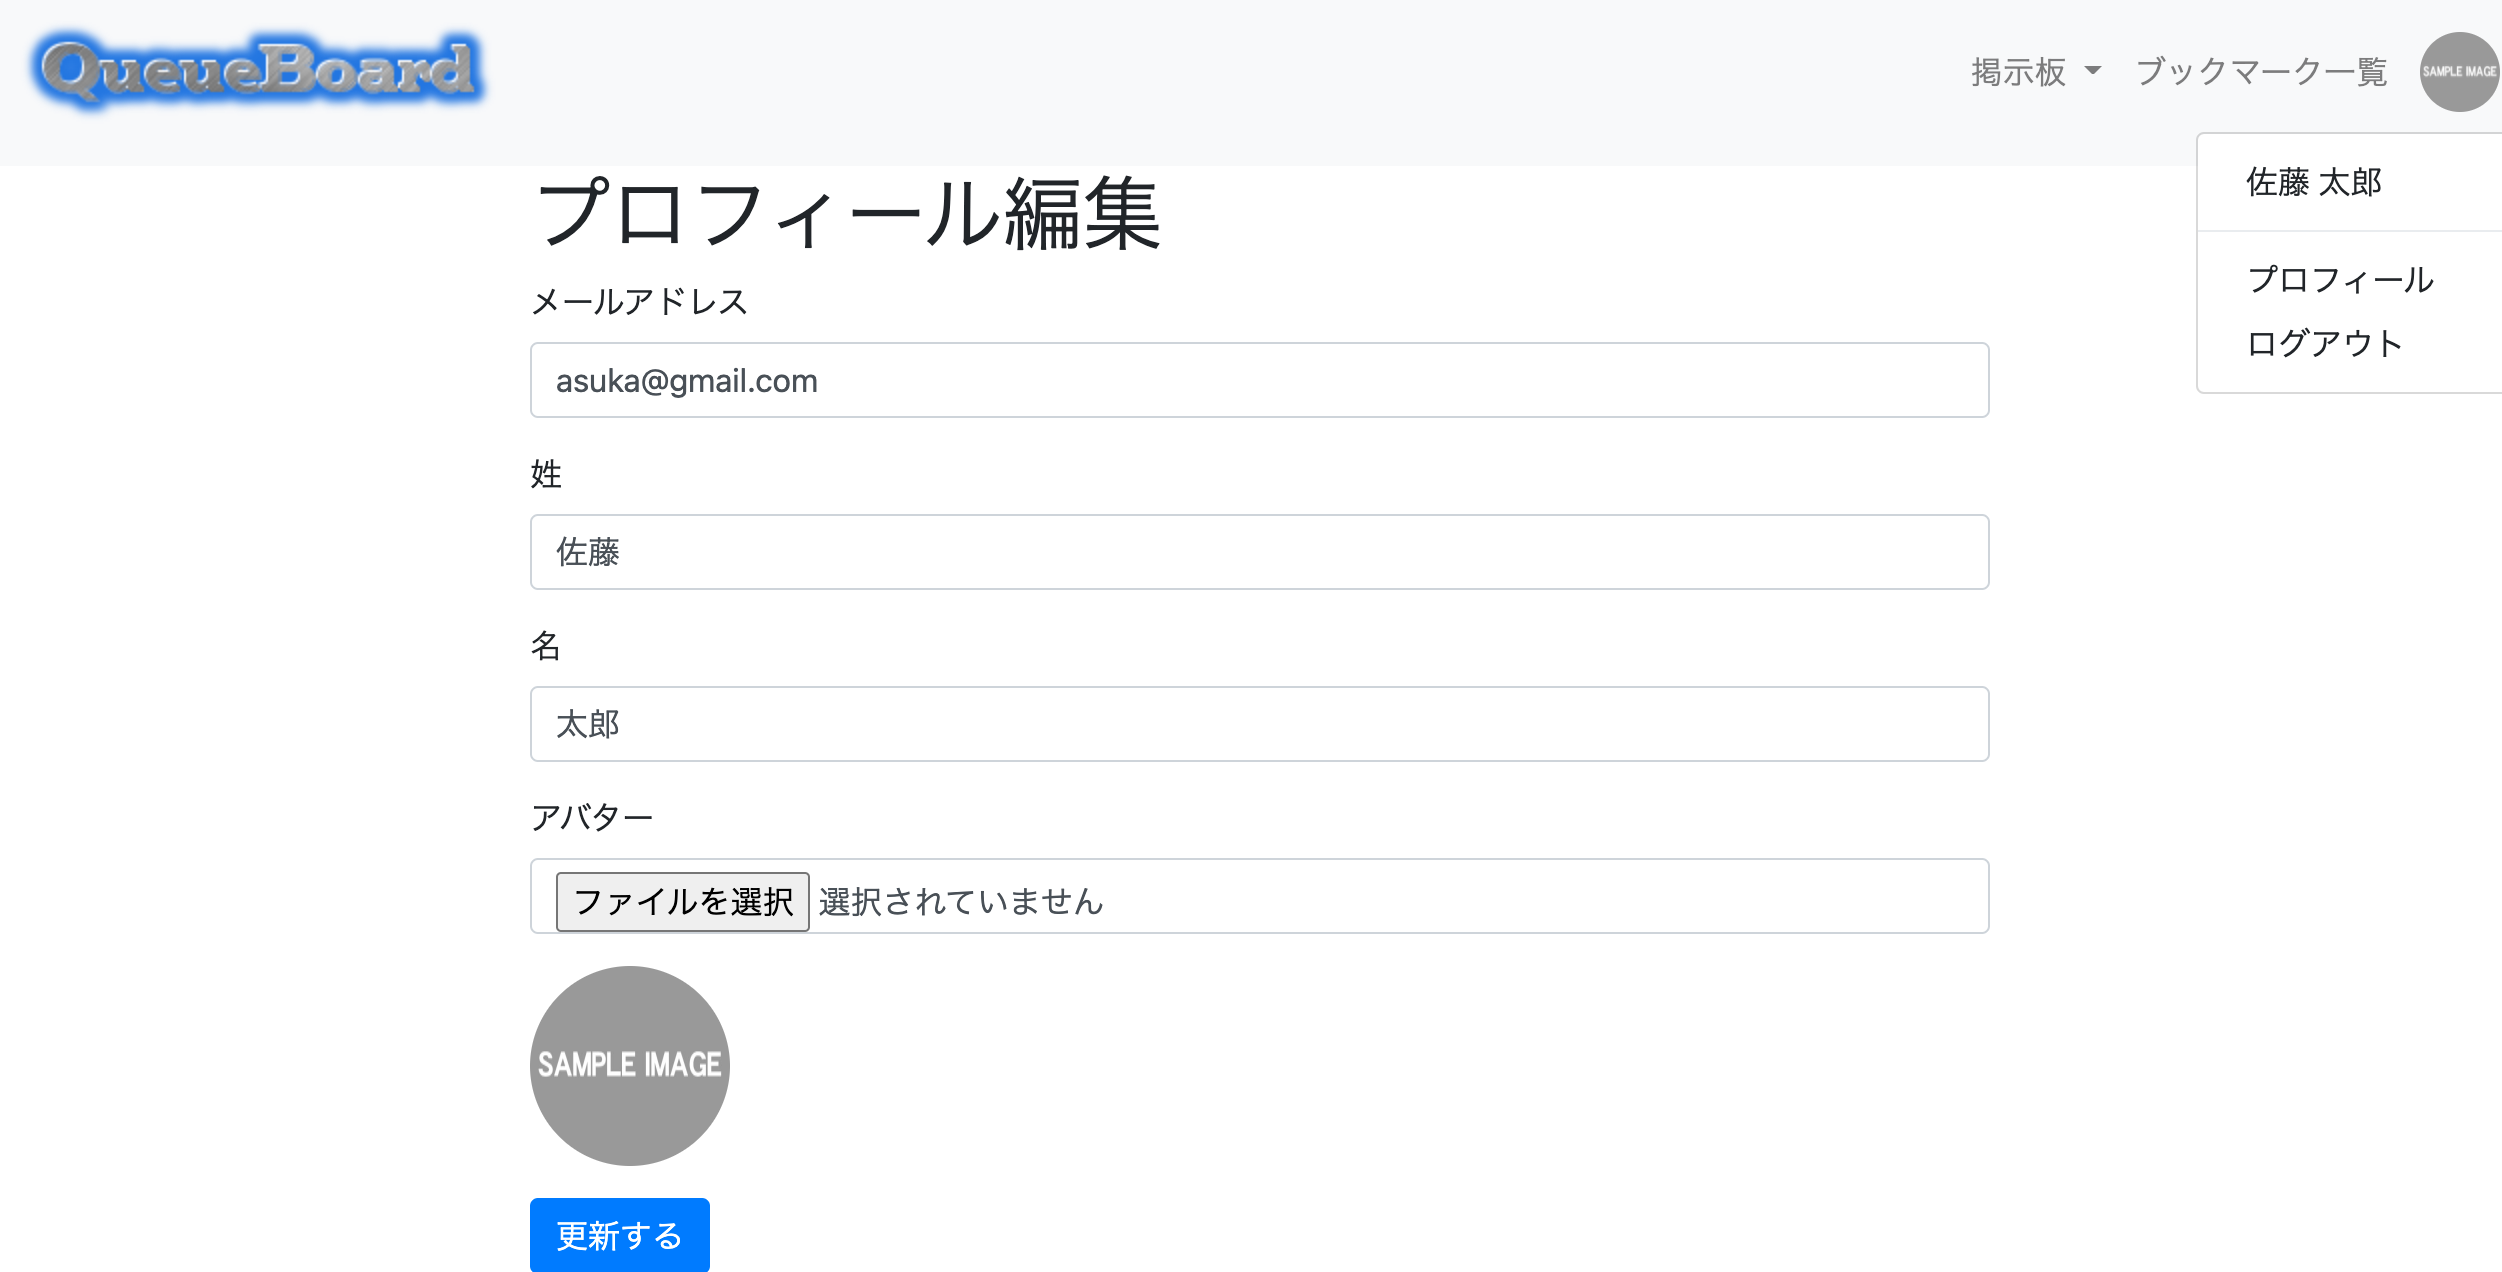
上記のようなプロフィール編集画面において、名前をバリデーションエラー(空欄で保存されないように)になるように更新すると、右上の名前が表示される部分がバリデーションエラーになってDBに保存されていないはずなのにバリデーションエラーの内容で表示されてしまう。

上記のようになってしまう流れは、以下のようになる。
[app/controllers/profiles_controller.rb]
  before_action :set_user, only: %i[show edit update]
  def update
    if @user.update(user_params)
      redirect_to profile_url, success: (t 'defaults.user_update')
    else
      flash.now[:danger] = (t '.fail')
      render 'edit'
    end
  end

  private

  def set_user
    @user = current_user
  end
①@user = current_userにより、@userには、DBから取得した現在のユーザーが格納される。
↓
②バリデーションエラーになるようにユーザー情報を更新すると、if @user.update(user_params)でassign_attributesにより、DBへの変更は行わないが更新された値を取得して@userに格納される。
↓
③上記の@userの内容(バリデーションエラーになる新しいユーザー情報)でsaveするとバリデーションエラーになり、コールバックされ@userの値が②の状態(@userの値がassign_attributesにより@userが更新したい内容になる)まで戻る。
↓
④上記で@userの値が変更されており、@userは@user = current_userにより参照渡しでcurrent_userのメモリアドレスを参照しているので、@userの値が変更されている状態なので、current_userのメモリアドレスも引っ張られて値が変わる。
↓
⑤バリデーションエラーにより、render 'edit'により再度プロフィール編集画面がレンダーされる。
↓
⑥レンダー後のプロフィール編集画面の右上に表示される名前が変わる。(右上に表示される名前は、<%= current_user.decorate.full_name %>というコードで記載しているため、current_userの値が変わっているので、表記が変わる。)
※ポイント
updateメソッドは、assign_attributesの後にsaveを実行する。
if @user.update(user_params)で、バリデーションエラーになるが、saveで発生しているため。バリデーションエラーによりコールバックされ、その前のassign_attributesまでは処理されており、@userの値が更新される。
※ assign_attributes:DBには保存せず値のみ更新する。
参考記事: