パスワードのリセット機能
パスワードのリセット機能
パスワードのリセット機能を実装するのに[sorcery]Gemの[reset_password]モジュール、[config]Gem、[letter_opener]Gemを使用する。
それぞれの役割は、以下のようになる。
[sorcery]Gemの[reset_password]モジュール: パスワードのリセット機能
[config]Gem: 環境毎に違う値を用いたい場合に、その値を分かりやすく管理することができる。
[letter_opener]Gem: 開発環境では、実際にメールを送らずにブラウザ上で送ったメールを確認することができる。
[reset_password]モジュールの利用手順は、以下のようになる。([sorcery]Gemのモジュールを利用するので、[sorcery]Gemの設定も必要。)
$ rails g sorcery:install reset_password --only-submodules
上記を実行するとマイグレーションファイルが自動生成される(自動生成されるマイグレーションファイルの内容が以下のようにUserになっているので、usersに訂正する。)
[db/migrate ファイル]

class SorceryResetPassword < ActiveRecord::Migration[5.2]
  def change
    add_column :Users, :reset_password_token, :string, default: nil, unique: true
    add_column :Users, :reset_password_token_expires_at, :datetime, default: nil
    add_column :Users, :reset_password_email_sent_at, :datetime, default: nil
    add_column :Users, :access_count_to_reset_password_page, :integer, default: 0

    add_index :Users, :reset_password_token
  end
end
上記のようなマイグレーションファイルが作成されるが、[add_column :Users]とユーザーテーブル(Users)が大文字で表示されるが小文字に変える。
↓
$ rails db:migrate
↓
$ rails g mailer UserMailer reset_password_email
上記コマンドで(UserMailerという名前のメーラーとreset_password_emailメソッドを作成)
↓
下記のように生成されたUserMailerのreset_password_emailメソッドに引数としてuserを付け加える。
[app/mailers/user_mailer.rb]

def reset_password_email(user)
↓
下記で使用するメーラーを設定する。
[config/initializers/sorcery.rb]

Rails.application.config.sorcery.submodules = [:reset_password]
Rails.application.config.sorcery.configure do |config|
  config.user_config do |user|
    user.reset_password_mailer = UserMailer      # 使用するメーラーを記載する
  end
end
↓
以下コマンドでパスワードリセットを行うためのコントローラーを作成
$ rails g controller PasswordResets create edit update
↓
上記で作成したコントローラーには、以下のように記述する。([sorcery]GemのgithubのWikiに記載されている)
[sorcery]GemのgithubのWikiには、newアクションは定義されていないが、newのビューも使用する為、記述する。
[app/controllers/password_resets_controller.rb]

# app/controllers/password_resets_controller.rb
class PasswordResetsController < ApplicationController
  # In Rails 5 and above, this will raise an error if
  # before_action :require_login
  # is not declared in your ApplicationController.
  skip_before_action :require_login

  # request password reset.
  # you get here when the user entered their email in the reset password form and submitted it.

  def new; end

  def create
    @user = User.find_by_email(params[:email])

    # This line sends an email to the user with instructions on how to reset their password (a url with a random token)
    @user.deliver_reset_password_instructions! if @user

    # Tell the user instructions have been sent whether or not email was found.
    # This is to not leak information to attackers about which emails exist in the system.
    redirect_to(root_path, :notice => 'Instructions have been sent to your email.')
  end

  # This is the reset password form.
  def edit
    @token = params[:id]
    @user = User.load_from_reset_password_token(params[:id])

    if @user.blank?
      not_authenticated
      return
    end
  end

  # This action fires when the user has sent the reset password form.
  def update
    @token = params[:id]
    @user = User.load_from_reset_password_token(params[:id])

    if @user.blank?
      not_authenticated
      return
    end

    # the next line makes the password confirmation validation work
    @user.password_confirmation = params[:user][:password_confirmation]
    # the next line clears the temporary token and updates the password
    if @user.change_password(params[:user][:password])
      redirect_to(root_path, :notice => 'Password was successfully updated.')
    else
      render :action => "edit"
    end
  end
end
上記の記載でも動くが、[rubocop]を通過するように記載すると以下のようになる。
[app/controllers/password_resets_controller.rb]

class PasswordResetsController < ApplicationController
  # In Rails 5 and above, this will raise an error if
  # before_action :require_login
  # is not declared in your ApplicationController.
  skip_before_action :require_login

  # request password reset.
  # you get here when the user entered their email in the reset password form and submitted it.

  def new; end

  def create
    @user = User.find_by(email: params[:email])

    # This line sends an email to the user with instructions on how to reset their password (a url with a random token)
    @user&.deliver_reset_password_instructions! if @user   # メーラーにメールの送信指示を出す+トークンを発行して、DBに保存している


    # Tell the user instructions have been sent whether or not email was found.
    # This is to not leak information to attackers about which emails exist in the system.
    redirect_to login_path, success: (t '.message')
  end

  # This is the reset password form.
  def edit
    @token = params[:id]
    @user = User.load_from_reset_password_token(@token) # # トークンを使ってユーザーを見つけ、有効期限もチェックし、トークンが見つかり有効であれば、ユーザーを返す。

    return if @user.present?    # ①

    not_authenticated  # 該当のユーザーが存在しなかった場合にroot_pathへリダイレクトされる。
  end

  # This action fires when the user has sent the reset password form.
  def update
    @token = params[:id]
    @user = User.load_from_reset_password_token(@token)   # トークンでユーザーを見つけ、有効期限もチェックします。トークンが見つかり、有効であればユーザーを返します。

    if @user.blank?
      not_authenticated
      return
    end

    # the next line makes the password confirmation validation work
    @user.password_confirmation = params[:user][:password_confirmation]
    # the next line clears the temporary token and updates the password
    if @user.change_password(params[:user][:password])   # トークンをクリアして、ユーザーの新しいパスワードを更新する。
      redirect_to login_path, success: (t '.message')
    else
      flash.now[:danger] = (t '.fail')
      render :edit
    end
  end
end
①の部分は、github記載の記述だとrubocopに引っかかってしまうので、rubocopに引っかからないように書き換えた。
(rubocopにガード節を使えと言われる。)
ガード節: 条件分岐の際に処理の対象にならない条件はネスト化を防ぐために最初の段階で条件処理から外すようにする事。(例えば、@userが存在しない時だけの処理を書く際は、@userが存在する場合は最初の段階でreturnして処理の対象から外すという事。)
    return if @user.present?

    not_authenticated

#上記で@userが存在する時(@user.present?がtrueの時は、return処理される)は、処理を抜けて、@userが存在しない時(@user.present?がfalseの時は、not_authenticatedに処理が流れる)は、not_authenticatedに処理が流れる。
↓
以下のようにルーティングを定義する。
(githubには、newアクションのルーティングが定義されていないが使用するため記述する。)
[config/routes.rb]

resources :password_resets, only: %i[new create edit update]
↓
使用するメーラーに以下のように記載する。
[app/mailers/user_mailer.rb]

class UserMailer < ApplicationMailer
  def reset_password_email(user)
    @user = User.find user.id
    @url  = edit_password_reset_url(@user.reset_password_token)    # 送るメール本文に使うURLをインスタンス変数に格納している。(送るURLには、URLの最後にトークンを付け加えている。createアクションでトークンが発行されDBにトークンが保存されているので、それを利用している。)
    mail(to: user.email,
         subject: (t 'defaults.subject'))
  end
end
↓
送るメール本文を以下のファイルに以下のような例で記述する。
[app/views/user_mailer/reset_password_email.html.erb]

<p><%= @user.decorate.full_name %> 様</p>
<p>===============================================</p>
<p>パスワード再発行のご依頼を受け付けました。</p>
<p>こちらのリンクからパスワードの再発行を行ってください。</p>
<p><%= @url %></p>
[app/views/user_mailer/reset_password_email.text.erb]

<%= @user.decorate.full_name %> 様
<p>===============================================</p>
パスワード再発行のご依頼を受け付けました。
こちらのリンクからパスワードの再発行を行ってください。
<%= @url %>
上記のようにhtmlファイルとtextファイルを両方記述するのは、htmlに対応している端末ではhtmlメールのデータを送り、htmlに対応していない端末では、textメールのデータを送ることが出来るようにするため。
上記のような受信者の環境によって表示するメールの形式が変わるものをマルチパートメールという。
上記のメール本文は、以下のファイルの[yield]部分に読み込まれて、メールが送られる。
[app/views/layouts/mailer.html.erb]

<!DOCTYPE html>
<html>
  <head>
    <meta http-equiv="Content-Type" content="text/html; charset=utf-8" />
    <style>
      /* Email styles need to be inline */
    </style>
  </head>

  <body>
    <%= yield %>
  </body>
</html>
↓
発行されたトークンがUsersテーブルのreset_password_tokenカラムに保存される時は、お互いのトークンがユニークでなければならないのと、パスワード変更時にはDBのreset_password_tokenからトークンが削除されるため、このままではユニーク制約に引っかかってしまう為、[allow_nil: true]を付与する事で、対象の値がnilの場合は、バリデーションをスキップするようにする。
↓
パスワードのリセット申請画面(メールアドレスを入力して、入力したメールアドレスにパスワードリセットの詳細が届く。)のビューファイルは、以下のようにした。
[app/views/password_resets/new.html.erb]

<% content_for(:title, (t '.title')) %>
<div class="container">
  <div class="row">
    <div class="col-lg-8 offset-lg-2">
      <h1><%= (t '.title') %></h1>
      <%= form_with url: password_resets_path, local: true do |f| %>  # 入力したメールアドレスをDBに保存するわけではないので、modelを渡さず、urlでパラメーターのアクション先(createアクション)を指定している。
      <div class="form-group">
        <%= f.label :email, (t '.email') %>
        <%= f.email_field :email, class: 'form-control' %>
      </div>
      <%= f.submit '送信', class: 'btn btn-primary' %>
      <% end %>
    </div>
  </div>
</div>
↓
送られてくるメールには、PasswordResetsControllerのeditアクションに対応するURL(トークン付き)が記載されており、
そのメール本文のURLをクリックした時のビューファイル(editアクションに対応するビューファイル)は、以下のように記載した。
[app/views/password_resets/edit.html.erb]

<% content_for(:title, (t '.title')) %>
<div class="container">
  <div class="row">
    <div class="col-lg-8 offset-lg-2">
      <h1><%= (t '.title') %></h1>
      <p><%= User.human_attribute_name(:email) %></p>
      <p><%= @user.email %></p>
      <%= form_with model: @user, url: password_reset_path(@token), local: true do |f| %>  # 新しいパスワードをDBに保存するので、Userモデルのインスタンスをmodel: @userで渡して、自動生成されるパラメーターの行き先のURLと実際にパラメーターを送りたいURLが違うので、urlでパスを指定している。
        <%= render 'shared/error_messages', object: f.object %>
        <div class="form-group">
          <%= f.label :password %>
          <%= f.password_field :password, class: 'form-control' %>
        </div>
        <div class="form-group">
          <%= f.label :password_confirmation, (t '.password_confirmation') %>
          <%= f.password_field :password_confirmation, class: 'form-control' %>
        </div>
        <div class="text-center">
          <%= f.submit class: 'btn btn-primary' %>
        </div>
      <% end %>
    </div>
  </div>
</div>
※ポイント
上記の流れを簡略化すると以下のような流れになる。
①パスワードリセットのリンクをユーザーがクリック
↓
②PasswordResetsControllerのnewアクションでパスワードリセットの申請画面が開く
↓
③パスワードリセットの申請画面にメールアドレスを入力して送信すると、PasswordResetsControllerのcreateアクションが処理をして、[トークンの発行・トークンをDBに保存・メーラーにメール送信の指示を出す]
↓
④設定したメーラーのアクションが処理をして、アクション内の処理によってメールを送信(送信されるメールは、[メーラー名/メーラー内で記載したアクション名]に対応するビューファイルが[app/mailers/application_mailer.rb]のyeild部分に読み込まれて送信される。)
メーラーと送信されるメールのビューファイルの関係は、コントローラーとビューファイルの関係と似ている。
↓
⑤送られてきたメール本文のURLをクリックするとPasswordResetsControllerのeditアクションが処理をして、パスワードリセット画面が表示される。
URLにトークンが記載されているので、どのユーザーがパスワードを変更しようとしているかが分かる。
↓
⑥パスワードリセット画面に新しいパスワードを入力して更新をクリックすると、PasswordResetsControllerのupdateアクションが処理をして、パスワードが変更される。(このパスワードが変更されるタイミングでDBに保存されているトークンは、削除される。)
[config]Gemの利用手順は、以下のようになる。
Gemfileに以下のように記載する。
↓
[Gemfile]

gem 'config'
↓
$ bundle install
↓
下記コマンドを実行して、環境毎に利用する値を保存するファイルを作成する。
$ rails g config:install
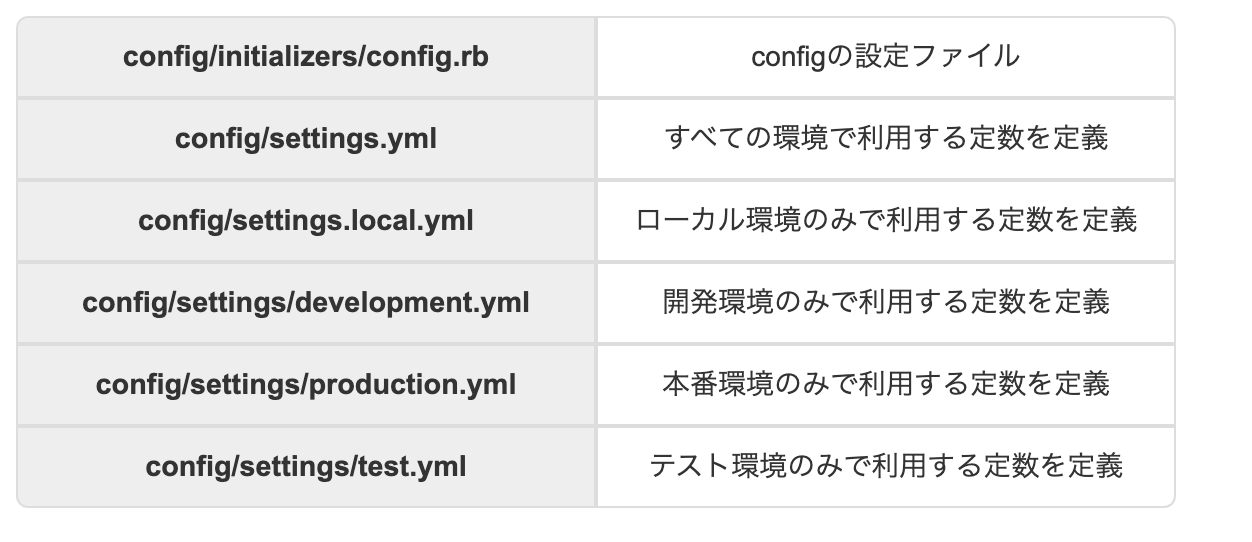
上記コマンドで作成された各ファイルの役割は、以下のようになる。
また、[rails g config:install]を実行することで、以下のように[.gitignore]ファイルに追加される。
[.gitignore]

config/settings.local.yml
config/settings/*.local.yml
config/environments/*.local.yml
[config/settings.local.yml]ファイルは、Gitの管理から外れているので、共有したくない事は、こちらに定義する。
↓
test環境とdevelopment環境でhost情報を変えたいので、以下のように記載することで[config]Gemを用いて各環境での設定の値を管理できる。
[config/enviroments/development.rb]

  config.action_mailer.delivery_method = :letter_opener_web
  config.action_mailer.default_url_options = Settings.default_url_options.to_h   # host情報の設定([config/settings/development.yml]ファイルに記載してあるものを読み込んでいる)
[config/enviroments/test.rb]

  config.action_mailer.default_url_options = Settings.default_url_options.to_h # host情報の設定([config/settings/test.yml]ファイルに記載してあるものを読み込んでいる)
[config/settings/development.yml]

default_url_options:
  host: 'localhost:3000'
[config/settings/test.yml]

default_url_options:
  host: 'localhost:3000'
※ポイント
・[config/settings/development.yml]や[config/settings/test.yml]のファイル名が[Settings]になっているのは、以下のように記述があり設定されている為。
[config/initializers/config.rb]

  config.const_name = 'Settings'
・[config/enviroments/development.rb]や[config/enviroments/test.rb]でhost情報を設定するのに[Settings.default_url_options.to_h]と[.to_h]と記載することにより、yaml形式をハッシュ形式で読み込むことができる。
以下に検証結果を記載します。
[config/settings/development.yml]

default_url_options:
  host1: 'localhost:3000'
  host2: 'localhost:3001'

[letter_opener]Gemの利用手順は、以下のようになる。
Gemfileに以下のように記述する。
[Gemfile]

group :development do
  gem 'letter_opener_web', '~> 1.0'
end
↓
$ bundle install
↓
[letter_opener]Gem用のルーティングを以下のように記載する。
[config/routes.rb]

  mount LetterOpenerWeb::Engine, at: '/letter_opener' if Rails.env.development?
  resources :password_resets, only: %i[new create edit update]
↓
以下のように各設定をする。
[config/environments/development.rb]

  config.action_mailer.delivery_method = :letter_opener_web   # 配信方法を設定。
  config.action_mailer.default_url_options = Settings.default_url_options.to_h   # host情報の設定(Settings.default_url_options.to_hでhost情報を取得できない時は、以下のように直接記述する)
config.action_mailer.default_url_options = { host: 'localhost:3000' }
↓
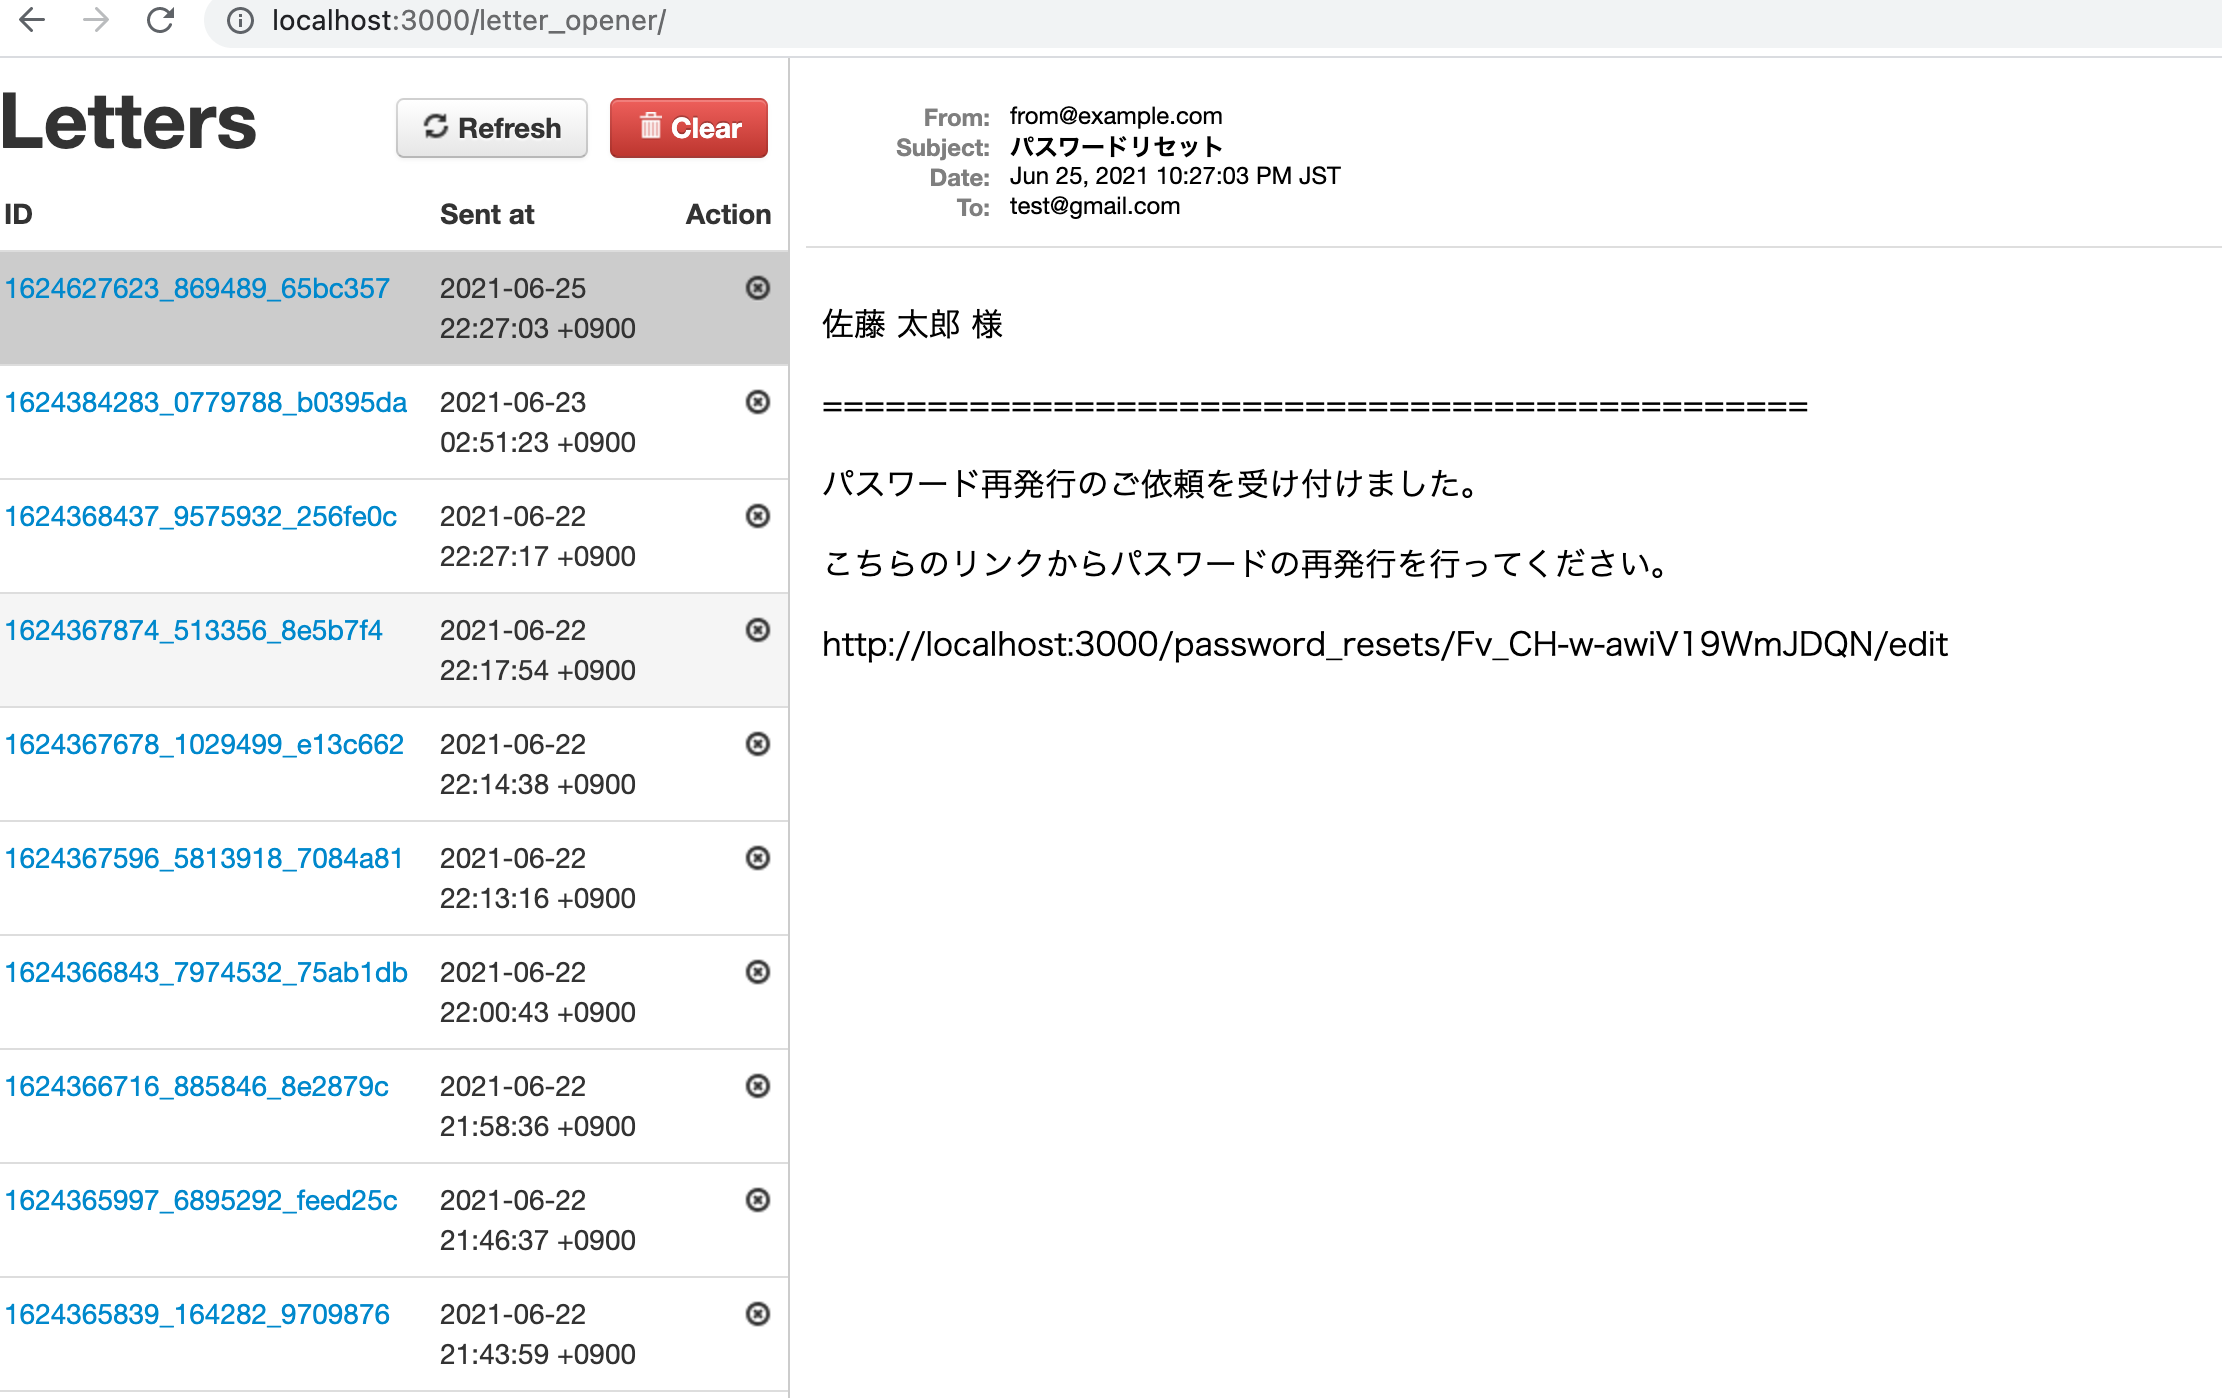
メール送信後http://localhost:3000/letter_openerにアクセスすると、下記のようにブラウザ上で送信したメールの受信内容が確認できる。
※ポイント
・アプリケーションのhost情報をメーラー内で使う為、host情報を設定しなくちゃいけない。
参考記事:
マルチパートメールって何?メルマガ配信で使う方法も公開します! | メール配信システム「blastmail」Offical Blog
【Rails】パスワード変更(トークンがどのように使用されているのか) - Qiita
https://yuta-blog.tokyo/rubocop-guardclause/
Rubyでreturnを使って条件分岐をシンプルに書く方法 - Qiita
sorceryのパスワードリセットを実装(reset_passwordモジュール) - Qiita
【Rails】パスワード変更(トークンがどのように使用されているのか) - Qiita
[Ruby on Rails]sorceryによる認証 – (7)APIでのパスワードリセット | DevelopersIO
Rails sorcery パスワードリセット機能の実装.|いずは. フォロバ100%します.毎朝7時.|note
Railsで、Action Mailerとletter_opener_webを初めて使いました - めるノート
【Rails】letter_opener_webを用いて開発環境で送信したメールを確認する方法|TechTechMedia